OUR STAIRCASE : THE PLAN

 
855e6a4b1273505e9aacc2fb1fe12e16.jpg
Organization-Ideas-19.jpg

Our almost-100-year-old little bungalow was blessed with a death-trap of a staircase. It's steep, tight, low in areas, and even has carpet from I don't even know when. I've had my share of spills down it, and anyone who is over 5'4 is sure to hit their head on the way up or down. Worse yet, if you're trying to carry anything up, there's a point about half way where you have to lift the item above your head, otherwise you slam right into the stairs above you. They are terrible. The worst. I am not exaggerating. AND, again... they are carpeted! YUCK!

IMG_4392.jpg
IMG_4390.jpg

So, we started to talk about how we can improve these stairs as-is and couldn't come up with any cost-effective way that would actually solve the issue. We had already been entertaining the idea of opening up the wall that separated our living room and the front bedroom. So, why not just move the direction of the stairs while we are it? Genius! 

IMG_4391.jpg

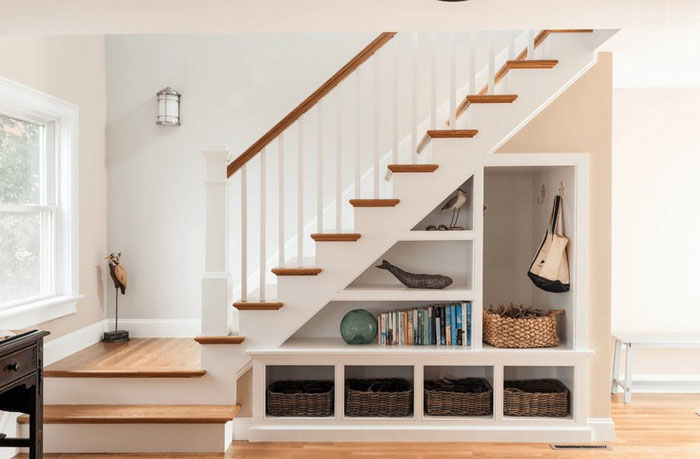
The idea is to have the new staircase follow up the side of the front bedroom wall (this room will later become part of our living room), beginning with a slight turn upward, and then continuing up in a straight path. This will give us a longer, more gradual stairway, and allow us to have more room to work with upstairs, eliminating a lot of dead space.

Our house also lacks quality closet space, and the current staircase intrudes into our bedroom closet at an angle, cutting off the otherwise usable top right corner and leaving us with an awkward, two-thirds of a closet. So, when we close it up during the new staircase build-out, we are also thinking of re-purposing the current staircase entryway into a walk-in closet, or into built-ins. 

IMG_4394.jpg

This major project will not only prevent injury or death to us and our guests, but open up the room, creating a very welcoming appearance (see inspiration photos above), and instantly adding major value to our home. Win-win! We are currently waiting for drawings to finalize with our engineer and are on the books for a mid-to-late April start! Can't wait to update with progress soon!

Inspiration photos 1 / 2 / 3 / 4 

Special THANKS to Bonney Johnson (aka prettygoodpdx) for letting me use her photos of her beautiful staircase - our major inspiration. 

Follow

DIY MID CENTURY INSPIRED HOOP LOG HOLDER

 
IMG_4072.JPG

Now that Danny and I have a fireplace, and actually have weather where it's practical to use it, we have been accumulating tons of firewood and not really having a decent place to put it in the house. So, I have been searching for cute, mid-century-esqe log holders, and, of course, I found one, and, of course, at a price that was NOT practical. So, I did some digging to try and re-create my own.

What you will need:

Steel Log Hoop
Brass Spray Paint
Twine or yarn
Steel wool
Microfiber cloth
Gloves (optional)


IMG_5526.jpg

Place iron hoop on a surface outside that you can get messy. Using a steel wool pad, brush over the hoop to smooth out any bumps or imperfections. Then, wipe down with a microfiber cloth to remove any dust or debris. Make sure your hoop is dry before spray painting.

IMG_5550.jpg

Then, smoothly and, in a steady left-to-right-right-to-left motion, paint the entirety of the hoop, holding the can far enough away from the hoop to avoid any patchiness and dripping. Let dry before flipping over to spay back side. 

IMG_5565.jpg

Once dry, wrap yard or twine around the bottom portion, creating a basket, and secure with small knots on each side.

IMG_5581.jpg
Snapseed.jpg

Wrap a small amount around the handle to tie in the basket design and...

_MG_5604.jpg
_MG_5623.jpg


Look at that! Your own DIY mid-century inspired hoop log holder! 

_MG_5624.2.jpg
_MG_5629.2.jpg
_MG_5634.jpg

Follow


VANLIFE // LA to PORTLAND

 
F8739C5D-B31B-42F2-90AB-0EE4BDA90746.jpg

This past weekend Danny and I (& Steve) flew back to LA, loaded up my father-in-law's '89 Dodge Starcraft with the remainder of our belongings, and started our scenic route back up to Portland. The last two drives up were quick and to the point, all up the dreaded I-5. So, this time we wanted to take it slower up the 101, make stops, visit quiet towns, and take in the gorgeous west coast-line. And the best part: we were Van Camping, aka VanLife.

We began our journey just a few short hours after I touched down in Los Angeles. There was no time to waste! We figured we would start the drive up the redundant portion of California at night, being that it is a route we have already seen more times than we would prefer. This stretch includes the infamous cow-death-camp, which can be smelled for miles on end at night. The idea was to drive as long as we could, then stop for some sleep, and then cut over to the 101 at day-break. We spent our first night at a rest stop in Huron, and I was surprised how clean and quiet it was. The three of us cozily snuggled into the van's built-in bed, surround by all of our house plants and Danny's instruments. At that moment I thought: I could get used to this.

IMG_2328.JPG
IMG_5079.jpg

We started our crossover near San Francisco, traveling through Berkeley, and over the Richmond–San Rafael Bridge to the 101. It's pretty amazing how quickly the scenery turns greener once entering Northern California. And of course, what road trip on the west coast would be complete without some In-N-Out, amirite?

IMG_5089.jpg
IMG_2529.JPG
4CF61917-80A2-49FC-868C-4D61D52BA56B.JPG

From there, we began passing through the towering redwoods of Humbolt County via the Avenue of the Giants. The air was so fresh and damp through this area that we could've hiked and explored for hours. There is something so majestic about California's Redwoods.

IMG_2379.jpg
IMG_5133.jpg
615C0FDA-8480-4934-B22B-100A82ADC927.jpg

Our last stop before calling it a night was in Eureka, CA. We had dinner at Nooner Cafe, a small Mediterranean restaurant tucked in an alley up against a speakeasy. I recommend their falafel with their honey tahini - it was really good. Full & tired, we passed over the Oregon state line and stopped at another rest stop nestled in the trees across from the oceanfront. I couldn't wait until morning - it would be the first time I got to experience the Oregon Coast.

Waking up excited, I finally got to see in person what I had been drooling over for years via other's Instagrams. And man oh man, was it better in person. Cameras cannot capture the aqua tone of the ocean on this coast. There really isn't anything like it.

IMG_2453.JPG
vanlife sbs.jpg
_MG_5170-2.jpg
_MG_5185-2.jpg
IMG_5194.jpg
IMG_5181.jpg

Left in awe from the scenic seascapes, we headed into Gold Beach for some caffeine before continuing on. We found a place called Rachel's Coffee Shop inside a pretty rad bookstore that also served some of the best homemade sticky buns we have ever had. Per recommendation of the regulars, go for the one with the nuts. I also have a hunch these bad-boys sell out fast, so get there early.

IMG_5196.jpg

At this point, due to time, we headed back over to the I-5 to complete our weekend adventure, unwind, and get ourselves ready for the week. Although I am sad we didn't make it to Tillamook and other seaside destinations this time, it only makes me more excited to come back to visit and explore more soon. Now, we just need a permanent weekender van. 

IMG_5239.jpg
9D177F01-EC2B-48E7-85E0-6A96B75E49C0.jpg

Follow