OUR STAIRCASE : THE REVEAL

 
_MG_8633 2.jpg

OUR STAIRS ARE DONE!!! Finally! From, start to finish it took approx. six months! But as my husband likes to say: the turtle always beats the hare. And yes, patience definitely paid off! They are beautiful and exactly what we wanted!


If you dare to look back at the before (and progress from week one and week five) these new stairs have completely transformed our home. It’s so airy, and natural light pours in - which is really important in Portland. It definitely makes for a great entrance into the house.

_MG_8606.jpg
srnrisersbs.jpg
_MG_8665.jpg
_MG_8658.jpg

Not only did the stairs turn out better than we thought, but our contractor gave our home a big upgrade with his awesome craftsmanship in the trim and moulding. We went with a base-trim to return the home back to it’s era after numerous previous owners did their own “upgrades.” In this he also added a very simple but very appropriate frame around our new window which I love so much! Eventually every window and door frame will have the same details. It ties in our mid-century style so well. The new window is also going to be our new standard for the house with the craftsman divided lights. We also replaced all of our floor registers from the dingy ones that were left behind that help tie in our vintage look with an antique brass finish.

_MG_8663.jpg
SRsbs.jpg

Picking the right paint and stain was probably one of the most difficult decisions we had to make in this project. Our treads are a gorgeous White Oak but we quickly found out do it’s absorbent nature we would need to use a gel stain that would give us the color we wanted while keeping the integrity of the grain while still being durable. We ended up going with a color called Candlelite that gives a rich tone without being too warm (and it matches our furniture!). Only downside is, gel stains take about five days to dry so prepared for that.
Then, I really struggled with the color, because I wanted all white walls, but Danny wanted a contrast between the walls and the trim so we compromised and went with Benjamin Moore’s “Cloud Cover”. It looks more like a Vintage White, and goes nicely with the all the wood. We had originally thought we would do all the painting and staining on our own to save money, but after we realized how tedious it was going to be, we decided to hire out the job - and it was worth every penny spent. The whole process took about a month.

_MG_8671 2.jpg

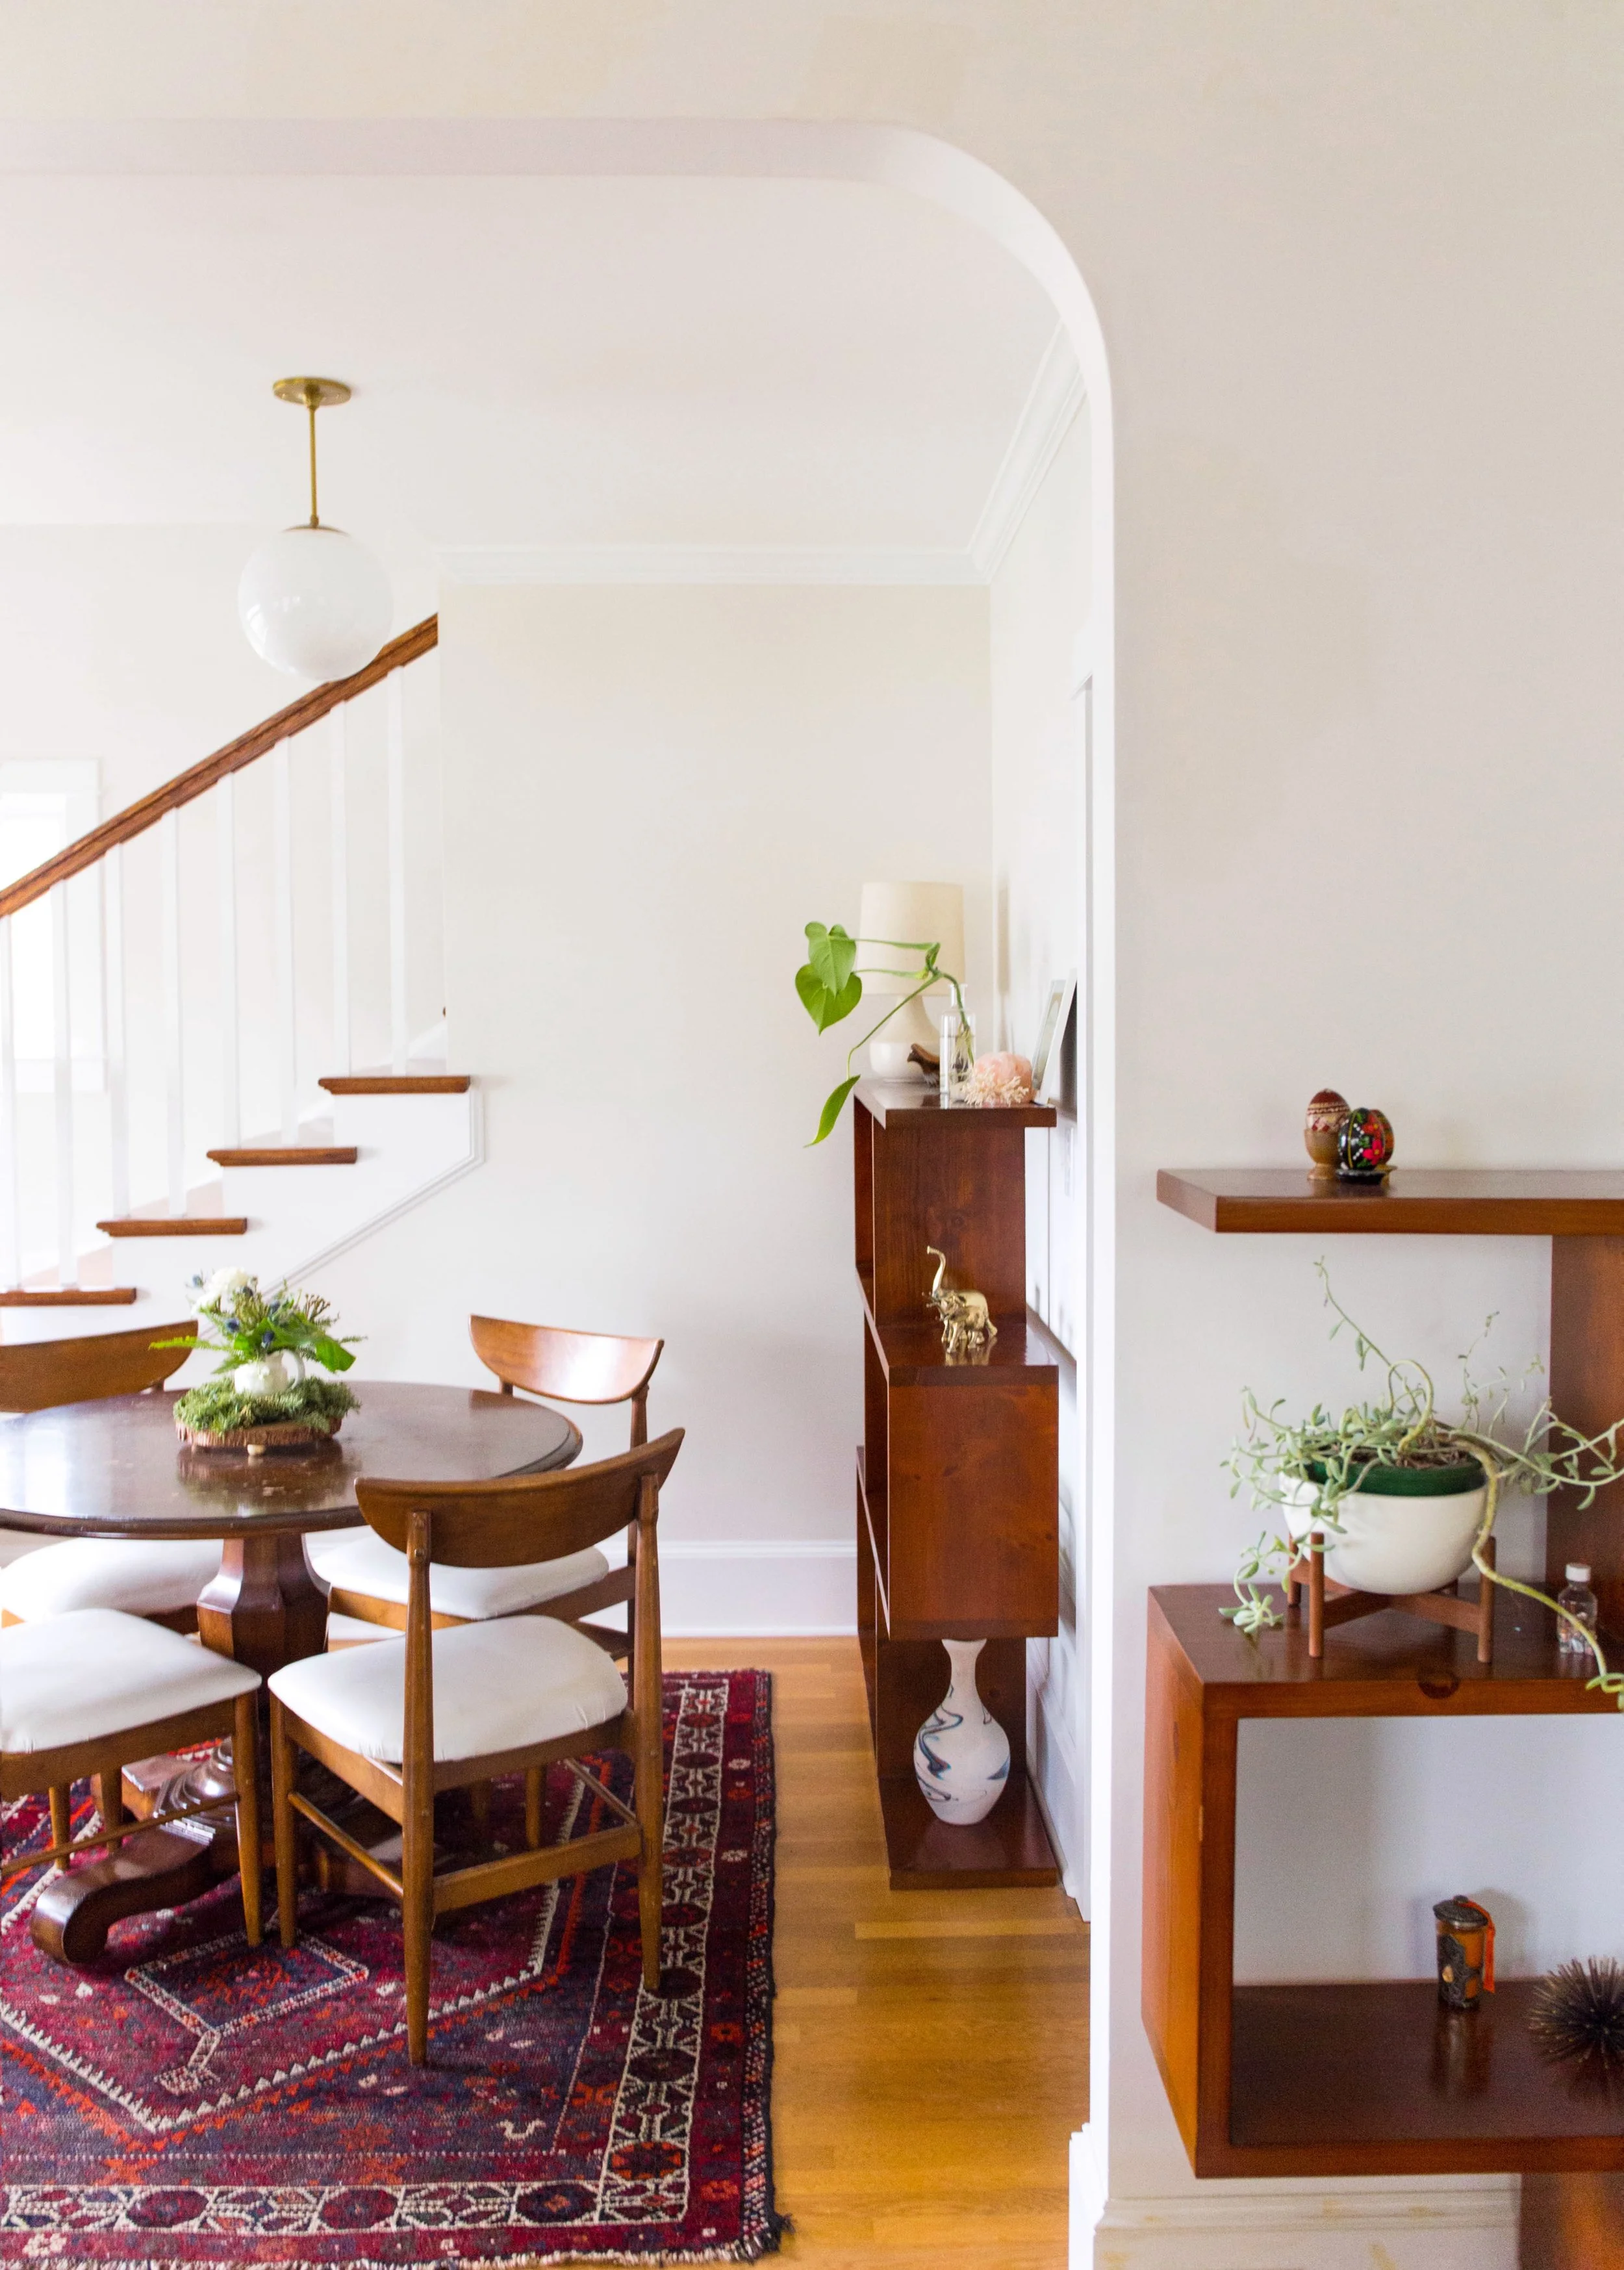
After the initial build was complete, Danny and I talked about what the functionality of this room would be besides just the stairs, since it was previously a bedroom. We never envisioned this room to be our dining room, but after placing our table in there while moving the rest of the furniture in from it’s hiatus in storage, it just made sense. The rest of our existing furniture then fit in perfectly, as if it was meant to be. But, the room really came together with the gorgeous light fixture from Schoolhouse Electric. Biggest plus side, now we have a great view of the fireplace while we have dinner or play games with family and friends.

_MG_8622.jpg

We are beyond pleased with how everything came out and could not be more grateful having met the people we did who made this all happen. Now to get some more plants and finish decorating!

Thank you so much David & Bryan, Nikole & Tom Peña, Bonnie Johnson, and Emily Moran. You dudes are the best. Xo.

Stair Newel - McCoy Millwork
Window - Milgard via Parr Lumbar
Paint - Benjamin Moore, Cloud Cover
Stain - General Finishes, Candlelite
Floor Registers - Home Depot
Lighting - Schoolhouse Electric
Rug - Vintage from PCC Flea Market
Chairs - Craigslist
Table - Goodwill
Bookshelves - Salvation Army
Flowers - Knot & Fern


Follow

OUR FIRST YEAR AS HOMEOWNERS: WHAT WE'VE LEARNED

 
IMG_2470.JPG

We recently had our one year anniversary of being homeowners - not only owning a home, but also renovating one. I know tons of people are in the same boat as us and they know: it ain’t easy. HGTV is great and I am definitely guilty in over-indulging on Fixer Upper and Property Brothers, but what you don’t see are the massive teams behind the scenes and the real cost of things. So I wanted to share a few thoughts from just an average, young homeowner on a real-life budget for those who are looking to buy, are in the process of buying, or who are looking to work on their little slices of earth.


START EARLY & DO YOUR RESEARCH

Looking for a home is very exciting. Things you never thought about are now major topics of discussion and it’s easy to get in over your head. But before you hop onto Redfin or Zillow, saving homes with cute windows, know where you stand.
Danny and I started talking to a mortgage broker well over a year before we were ready to buy. We were fortunate to have gotten in contact with a broker and realtor with tons of patience to walk us through all the steps, numbers, rates, ALL the terminology, and what it would take from us as life-long-renters to make the leap. Knowing how much you can actually afford may surprise you and will set you up with realistic expectations. This will also give you the time and wiggle room to set yourself up for success and save for the appropriate down payment you will need to make your monthly mortgage one that works for you.

Starting early also allows you to get organized. There will be a billion questions lenders are going to ask you and you had better be ready with answers and paperwork to support them. The escrow period is really just a giant audit of your financial life and the decisions you have made. So, if you’re thinking of buying a new car or taking a fancy vacation before you buy a home, you should probably wait. Take it from me.

Remember, the broker and realtor are there to help you get the house. Find ones you can trust and you get along with. They will be your best friend through it all.

Lastly, really do your research of where you want to buy. Be honest and ask if you can see yourself in that particular neighborhood for a long period of time. Does that area appreciate in value? What is it like in the evenings? A home’s appearance can always change overnight, but neighborhoods take a bit more time. For Danny and I, we ended up buying the home we did for the neighborhood. Make sure the area fits your lifestyle and your daily needs. Otherwise, you might find yourself away from home more than you want.

Screen Shot 2018-11-29 at 12.30.10 PM.png


YES, IT COSTS THAT MUCH… PLUS MORE

A window is $1k??? What!? Painters costs how much? WE NEED A NEW ELECTRICAL PANEL?!?!

If you buy a home that will need some love, don’t believe what you see on TV or what you read online. Because, yes, it DOES cost that much and will likely be more than you anticipated in the end. DIY is great and we are total advocates, but there are just some things you cannot do, or just flat don’t want to because really, who has the time? Materials and labor cost a lot. That’s just how it is. Things cost as much as they do for a reason, so don’t cut corners. You’ll end up spending way more in the end.

When hiring professionals, get as many quotes as you can and do your background research on them before committing to any one. You’ll be surprised at some of the ranges you will get. Then, whatever cost you agree on, set aside a little more as cushion. You never know what lies in your walls until you start opening them. Sometimes, it’s nothing, but again, you never know… And then, if you don’t need it, now you can buy that nice piece of furniture you’ve had your eyes on for your new room!

Screen Shot 2018-11-29 at 12.30.36 PM.png

NEVER ASSUME

Ask questions. TONS OF THEM. Who cares if you sound like a crazy person.

I think this is the most important thing I have learned in the last year. I work full time and unfortunately cannot be there during the normal hours people work on our house, so sometimes decisions get left to someone else. Don’t ever assume they will know exactly what you want because they aren’t you. No one can read your mind or know your exact vision unless you constantly ask questions and get involved. If not, sometimes it will be too late, and well... you’re just going to have to live with it for a while, or forever. Be clear, concise, create diagrams by hand or in a simple CAD application like SketchUp, if you have the skillset. Do whatever you have to do. Be over-attentive to detail. This is your home and your money, after all.

Screen Shot 2018-11-29 at 12.31.28 PM.png

DOUBLE YOUR LEAD TIMES

Planning a party or have family coming to visit soon? Probably not a good time to start any projects. Renovations of any kind take a while. Whatever lead times you set aside for yourself or receive: double it. When we started our stair project (which is still not 100% done) we anticipated six weeks for completion. At WEEK TWELVE we were finally able to remove the plastic walls and use them regularly. Good work takes time so you have to be flexible. Materials can easily not be available or backordered, and you know what - contractors are humans too, with families, and they need breaks. Be patient no matter what comes up (the struggle is real), you’ll be thankful in the end .

Screen Shot 2018-11-29 at 12.39.38 PM.png

MAKE REALISTIC EXPECTATIONS

Lastly, don’t set yourself up for disappointment. I, for one, was terrible with this. I wanted things done a certain way and wanted them done NOW. This made the whole process tough and exhausting.

Know that not everything is going to work out as you plan and be ready for the rollercoaster. Be realistic with your wants vs needs. Make a list of real priorities to help set yourself up for what can really be obtained with your timeline and budget. Learning how to live in less than ideal situations is going to be a big part of the process in any home buying or renovation. And really, when you live in an unideal space, it gives you the chance to be creative with what you got. You might impress yourself with what you come up with.

Screen Shot 2018-11-29 at 12.39.05 PM.png

Being a homeowner has taught us so much and has also put a lot in perspective. I am so grateful to be able to have experienced all the things mentioned above and encourage everyone to take risks and make themselves uncomfortable sometimes.

Thanks for being here.

Follow

SIX STYLISH & AFFORDABLE SOFA BEDS


We bought this house with a guest room in mind, but as time goes on and understanding the practical everyday needs of our house, the idea of having a whole bed set up 24-7 in our downstairs bedroom/office just doesn’t make sense. And with the holidays quickly approaching and family and friends coming out to visit us more, we have been working on creating a comfortable space for overnight guests. So we started researching sofa sleepers to make the office a usable room by day and a comfortable get-away by night.

Since our house is older and the rooms are on the smaller side, we have been in search of a smaller footprint sofa bed that also fits our style and wont break the bank. After combing through what seems like hundreds of outrageously, ugly, and poor reviewed sleepers for thousands of dollars (yeah, no thanks - we have windows we want to replace!), I have rounded up six stylish yet affordable sleeper sofas!

Kiko Futon Sofa, West Elm $999
Karter Sleeper Sofa, Urban Outfitters $699
Mid Century Futon Sofa, West Elm $999
Bella Sofa Sleeper, Urban Outfitters $600
Trevor Sofa Sleeper, Overstock $600
London Sofa Sleeper, Living Spaces $700


Follow