OUR EXTERIOR: THE PORCH


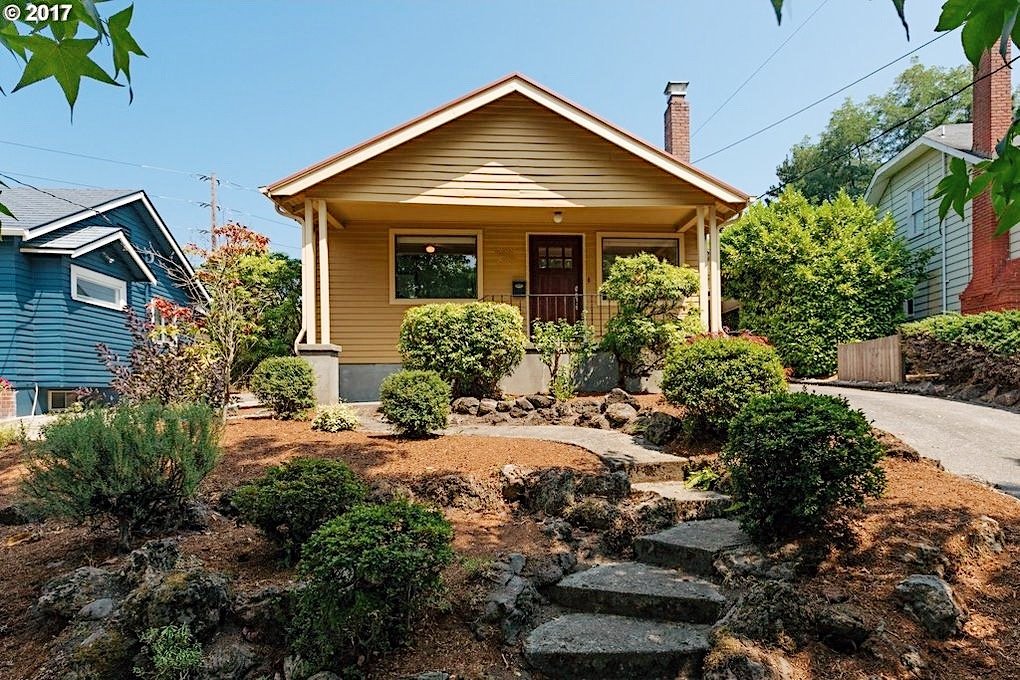
Our one and only big house project this year: The Porch!
After speaking with some GCs earlier this spring and getting pricing for the remainder of our exterior projects we decided to break it down into a handful of smaller jobs. First up is the porch! Apart from curb appeal, we really want to tackle this first to make better use of the space and have a covered place to sit outside when it rains.

BEOFRE

BEFORE

After many walks and bike rides in our neighborhood we already had a sense of how we wanted this to look while sticking with the 1924 era of the home. Luckily, Danny is really good at SketchUp and drew up a to-scale model which came very handy when conveying our vision to contractors. In addition to replacing the header and siding, we wanted to extend the porch and re-model our posts and railing.

After that, finding the right contractor was the real mission. As luck would have it again, one day when I was on my run I passed by a house a few blocks from us getting the same exact work done that we need AND what seemed like the homeowner was outside. I first ran past feeling too shy and invasive, but I turned around and introduced myself. I asked her how their project was going, are they happy, how’s the crew, etc. I am so glad I did this because after the roof fiasco we made a promise to never to use anyone without getting first hand feedback. She said all great things and gave her thumbs up so I gave them a call, we met, we liked the guy, and we got a quote. Some things felt fair and some felt high. But, first to follow the rules, we also contacted a few other recommended GC’s to gather other quotes. Those others either were ven higher and pushy, never sent us a quote or just fell off the side of the earth. Who knows. Either way, we ended up hiring the first guy. Eight weeks later, work began!


TOP
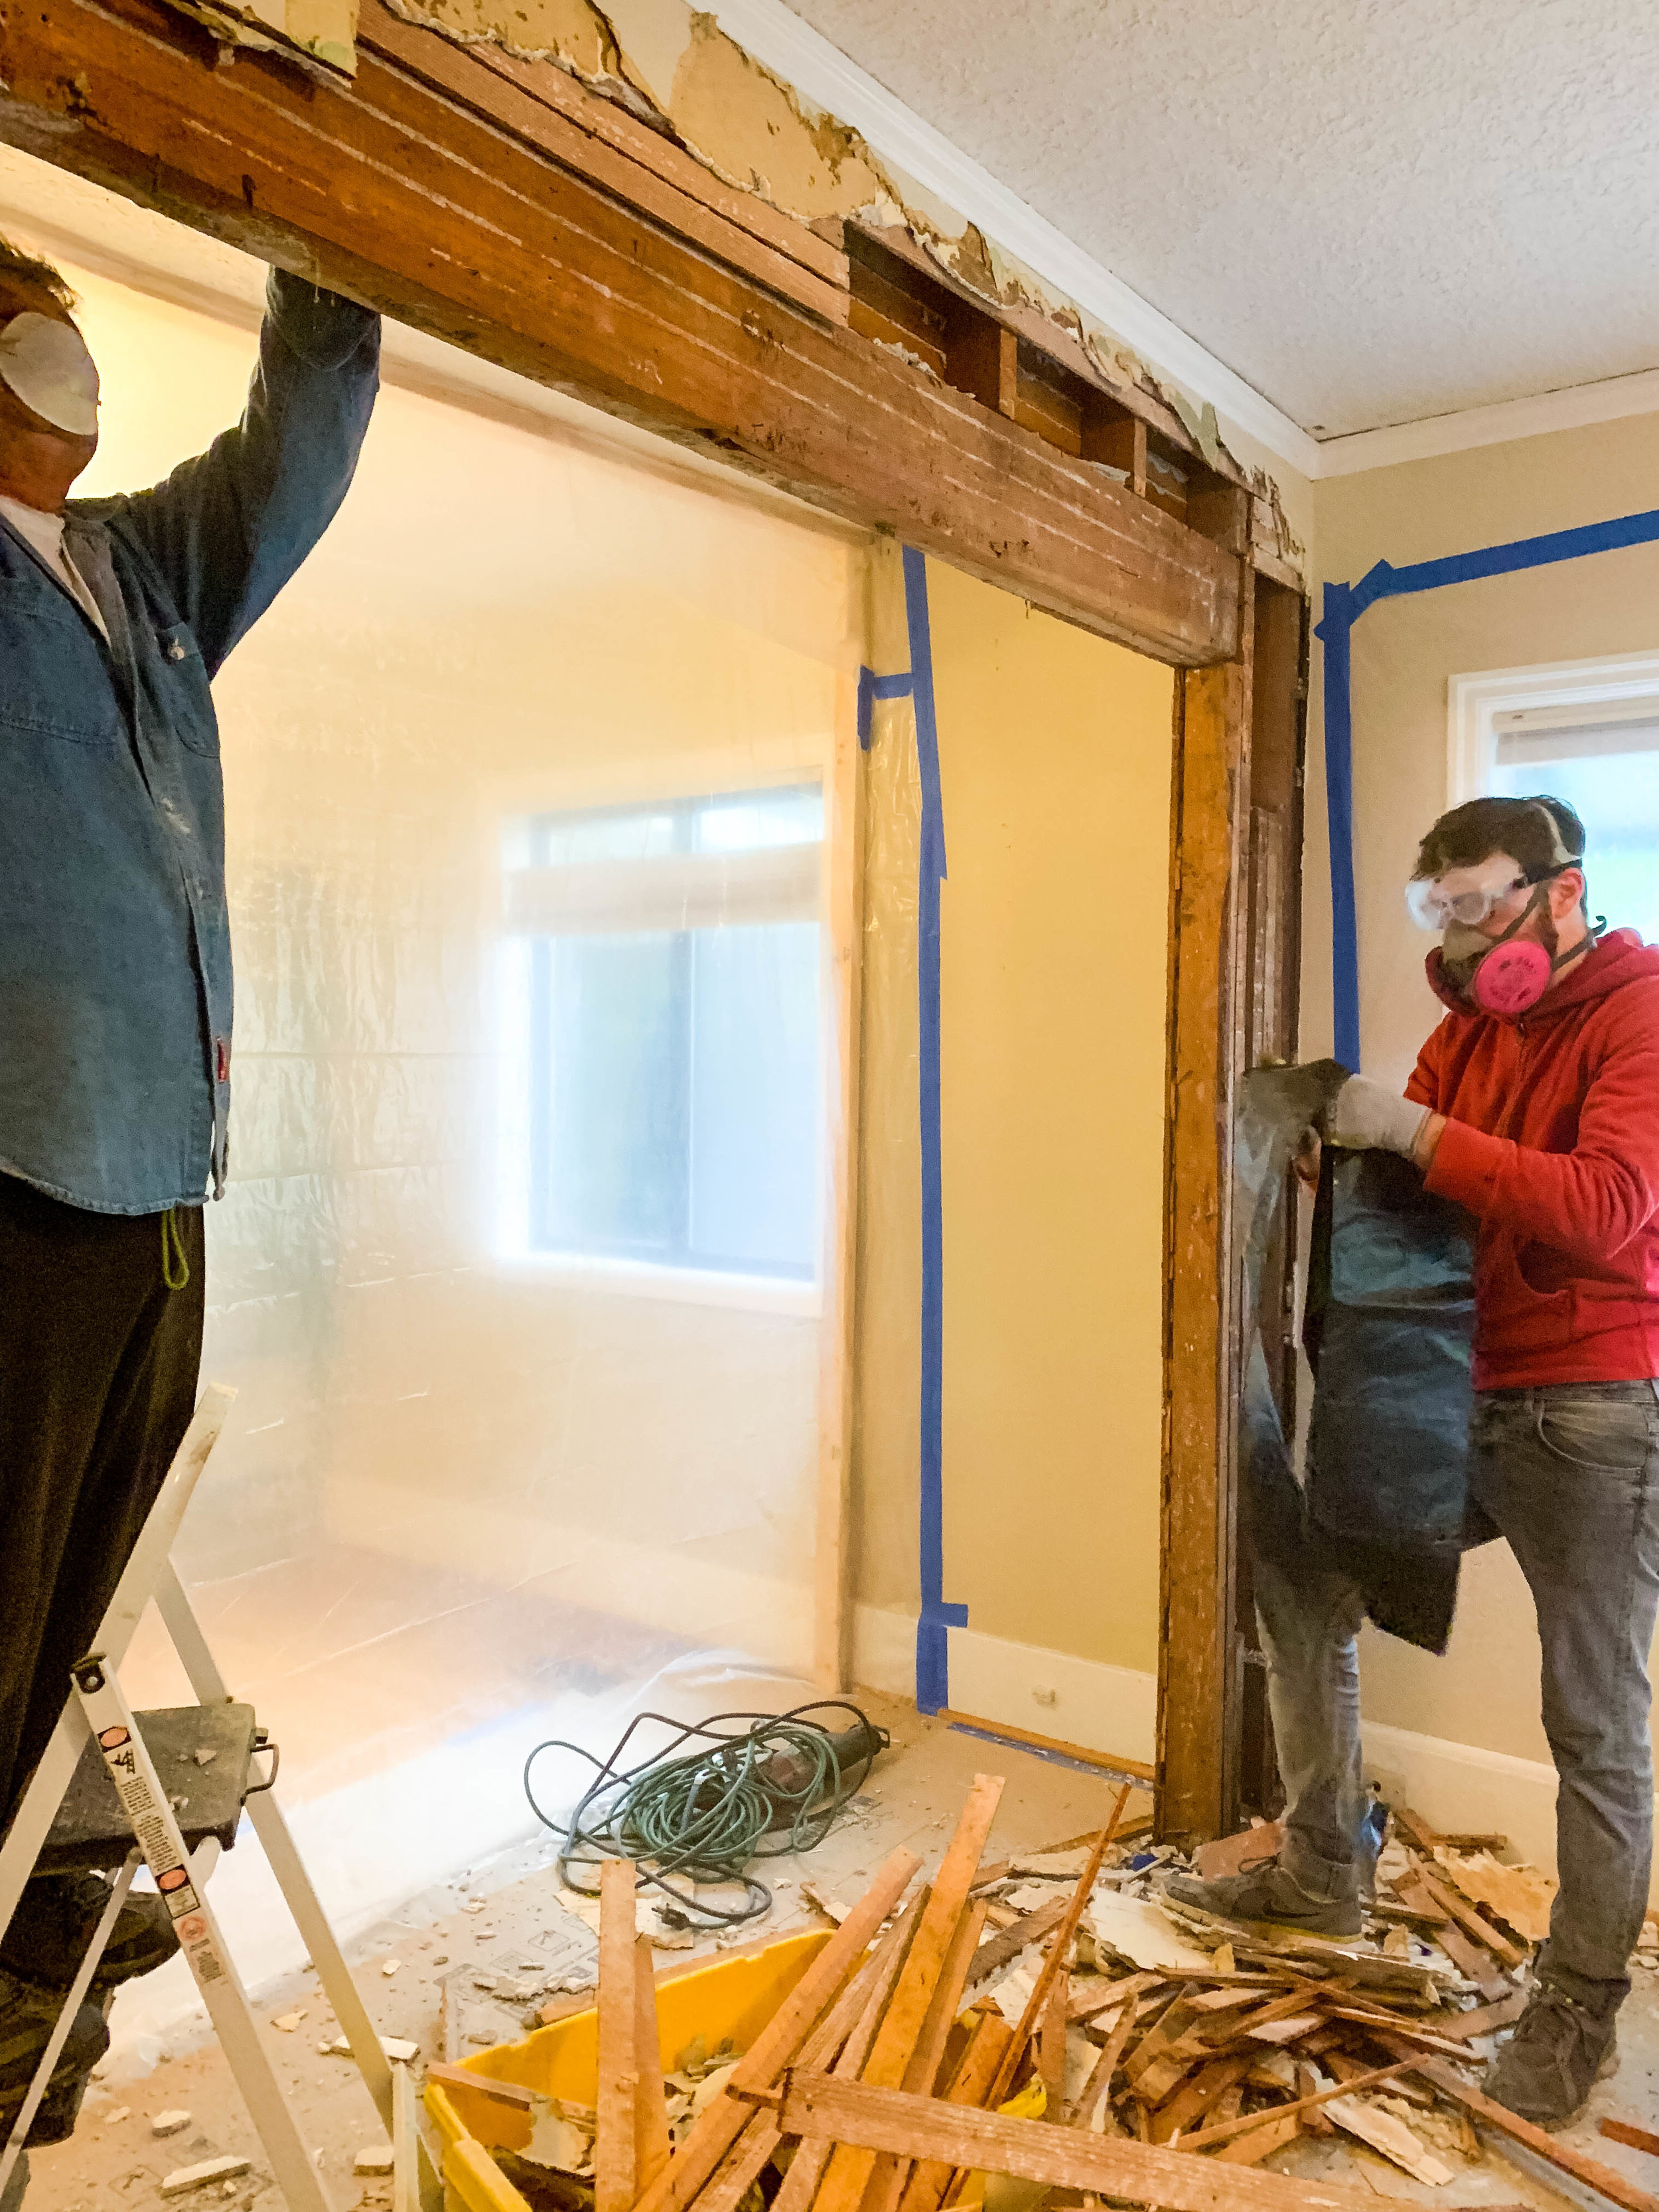
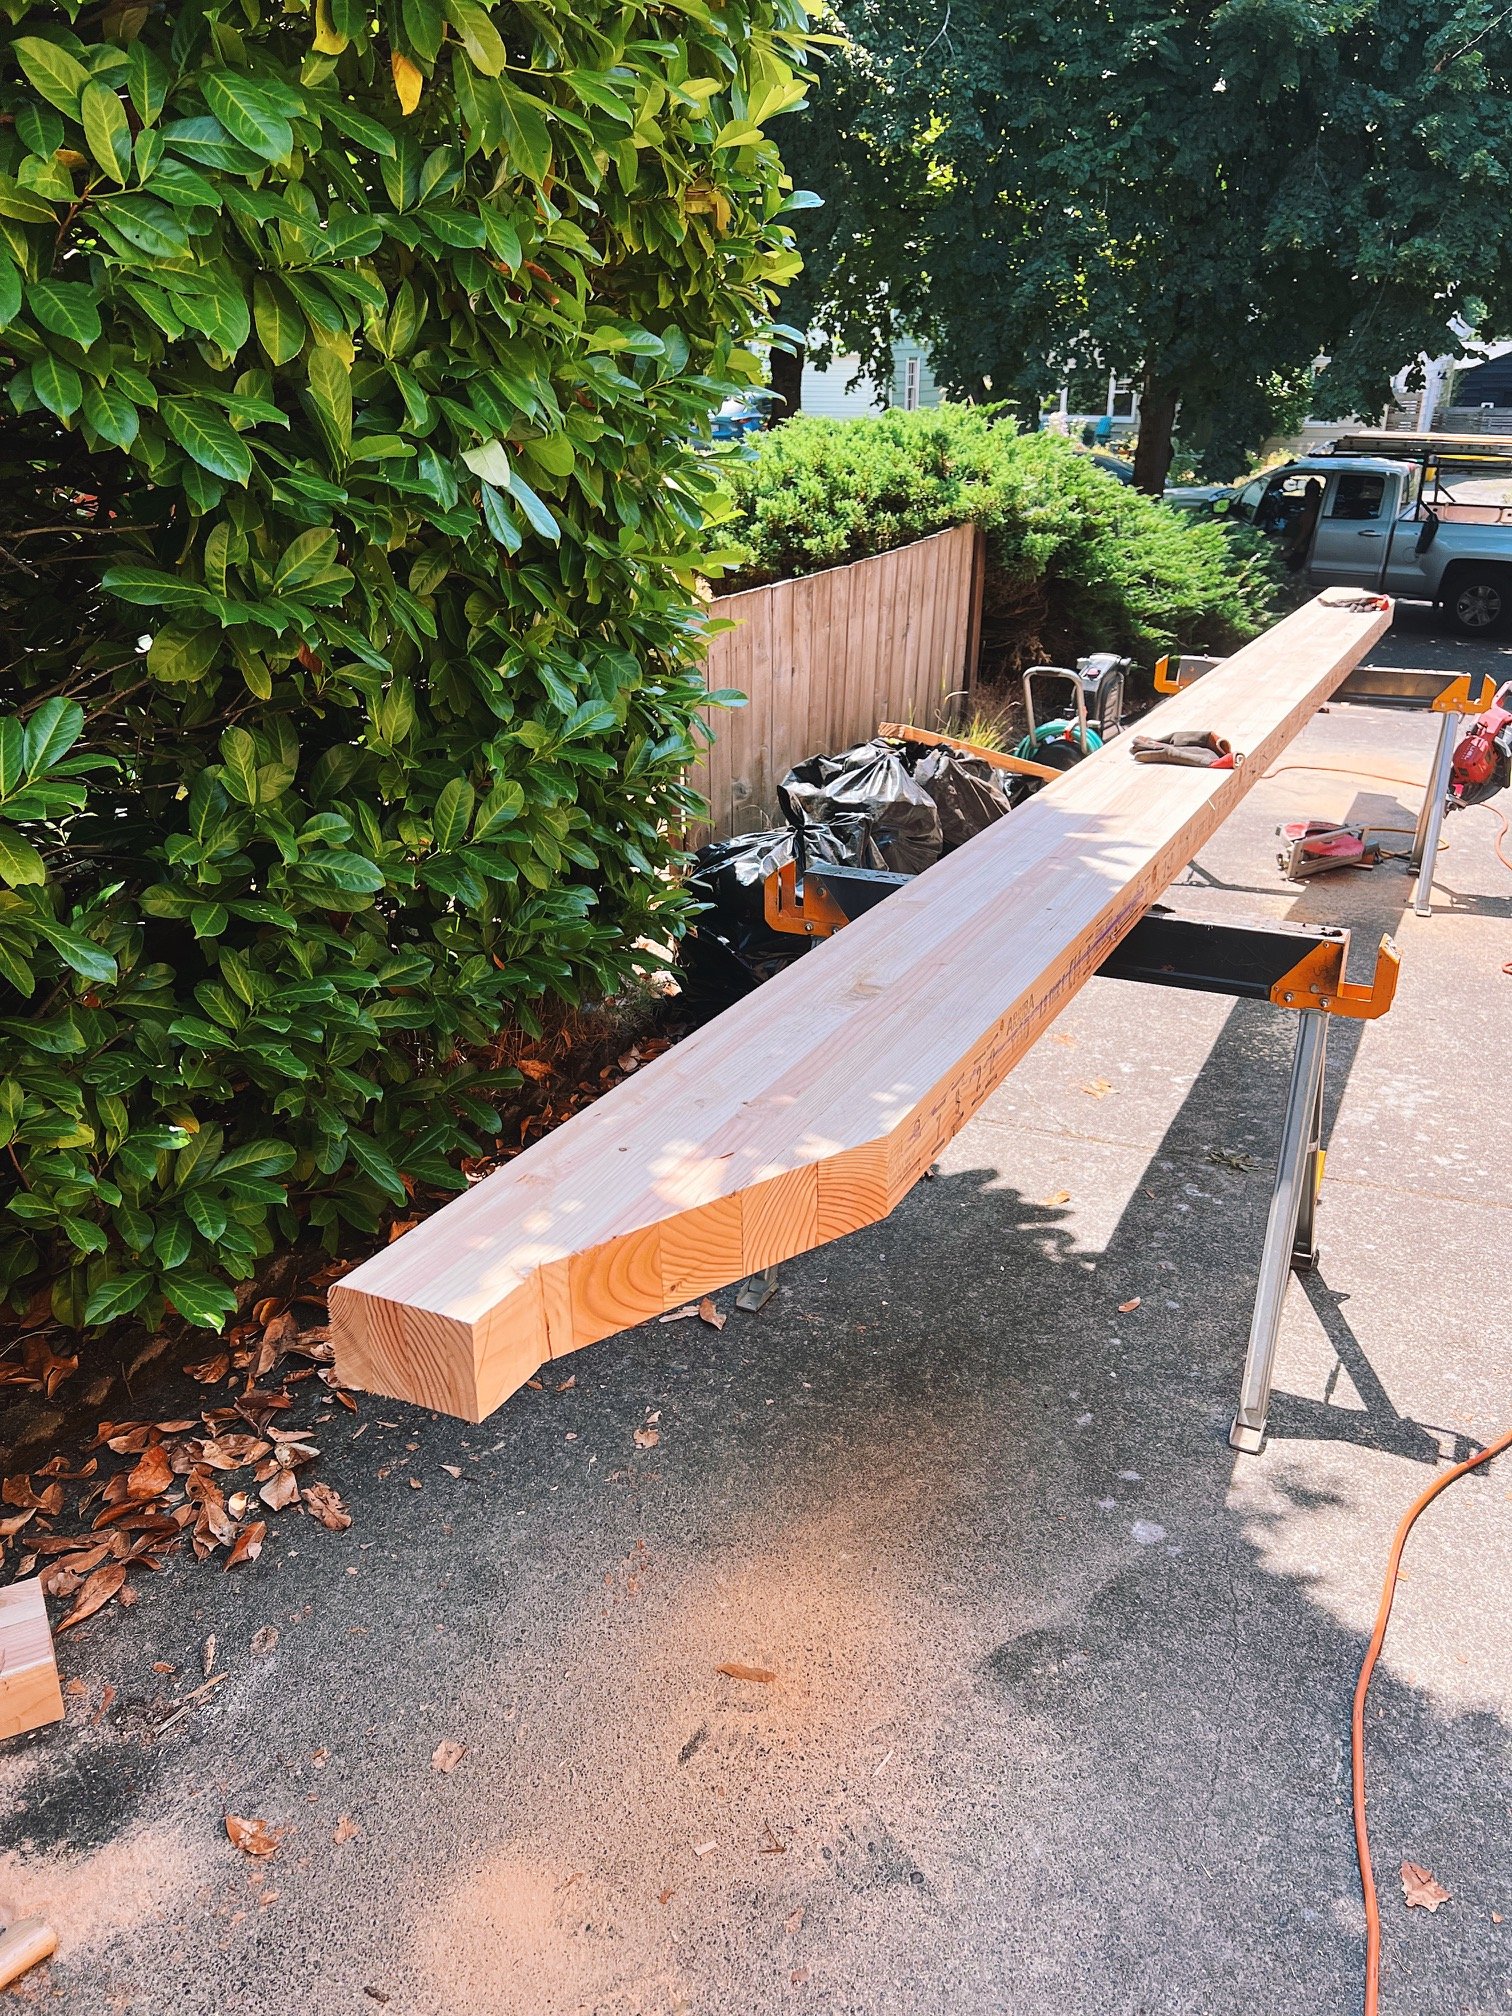
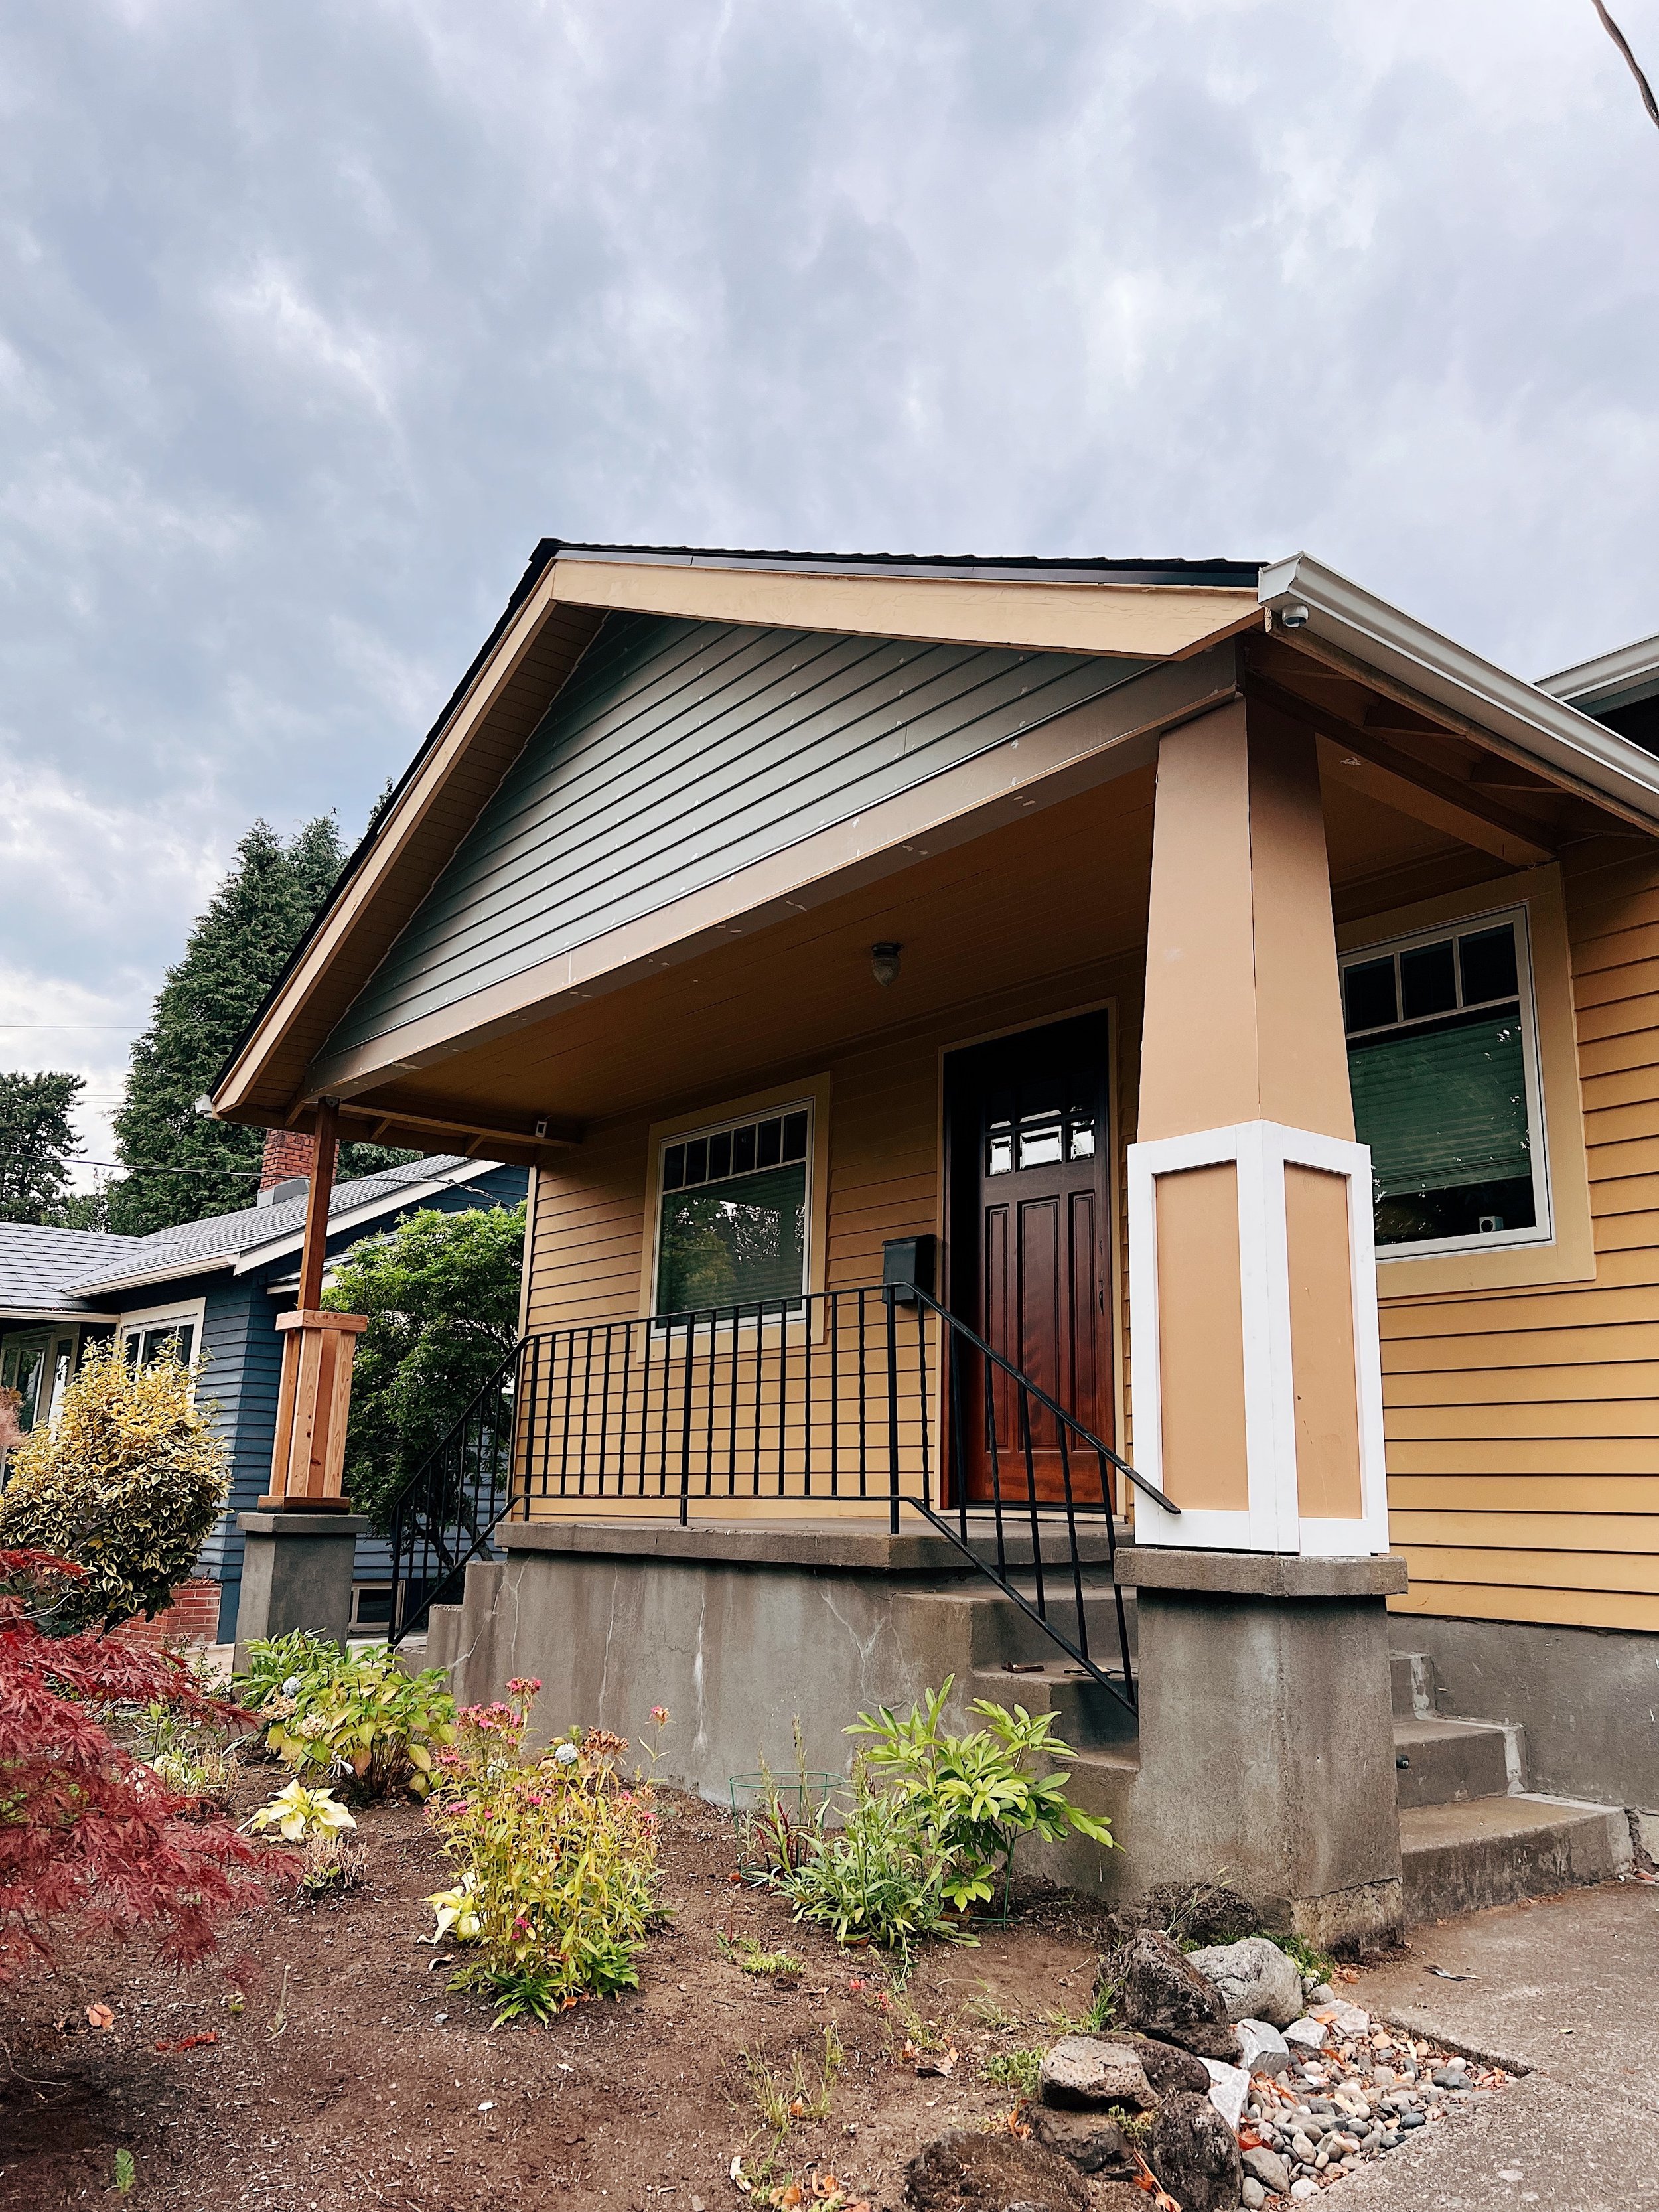
Top to bottom! The header has been sagging ever since we bought the house and it’s been driving us nuts. Luckily it never got worse, just stayed ugly. The plan was to replace it with a single 25’ glulam beam. This would increase overall support and is incredibly durable. When the crew started demoing we were able to see that the existing beam was actually six smaller beams nailed together, and not well either. No wonder! At least it was a relief that nothing was actually sagging and it was just poor craftsmanship. They also removed all the cedar siding above since it was uneven and old. After this was complete I couldn’t believe already how big of difference this made. Straight lines! What a concept!

MIDDLE

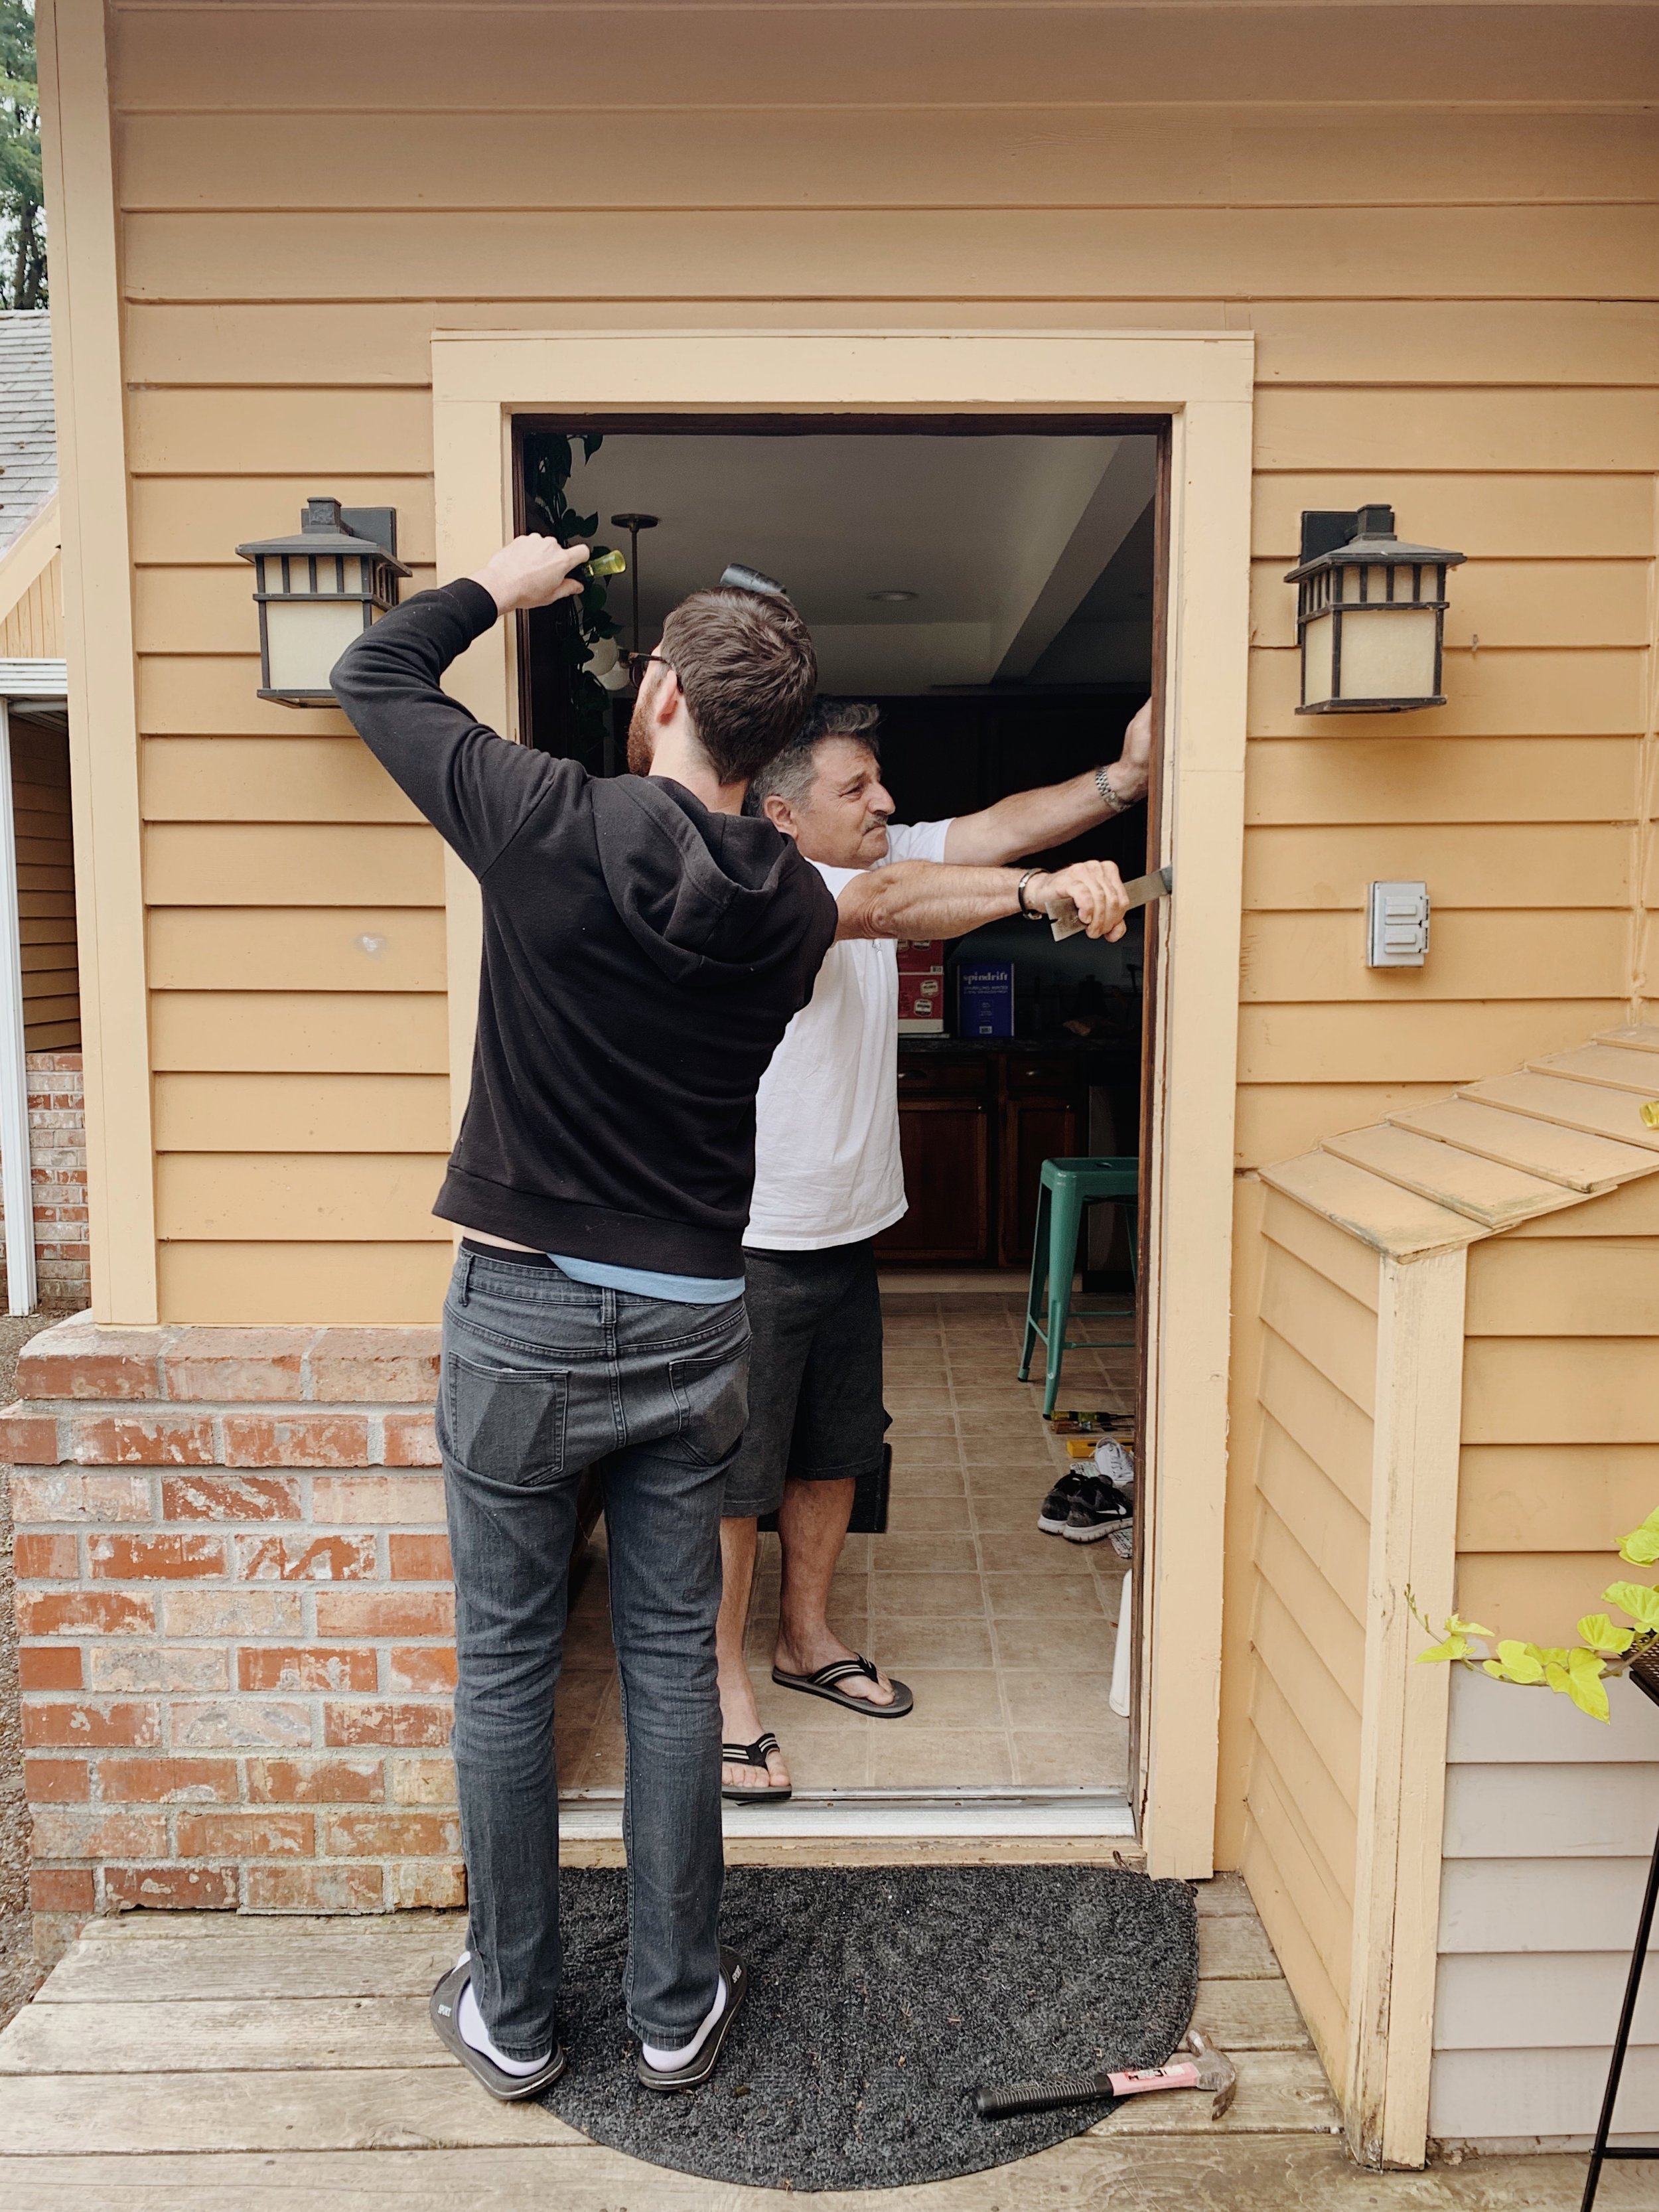
Next: The posts! My god the posts! Another part of the porch that we have never loved. Literally four 2x4’s just standing there looking like crap. Our GC also pointed out that they were actually never properly anchored so literally just standing there. When they went remove these they just pushed them out. What a joke. Anyways, back to keeping with the 1924’s era of the home… we wanted to do a thicker, tapered post with moulding because we all know I love it. Danny also drew up an awesome detailed rendering of what he wanted. The carpenter, Vlad, was so great and he made our dreams come true creating exactly what we wanted. He followed our design to a tee and truly was a craftsman at what he does. And he did it alone! Vlad is welcome to work for us again anytime! We also replaced a few of the fascia boards ourselves.

BOTTOM

Last but not least: the actual porch. We had two sets of stairs: one leading up a little pathway from the sidewalk and then another from the driveway. In the five years we have lived in this house, I have only seen the middle path be used TWICE. Everyone goes up the driveway. So when we decided to extend the porch out I wasn’t concerned about losing this option.

For this part, we hired a different GC who specialized in hardscaping. My colleague at work had used this guy before and gave her seal of approval and once again first hand feedback did not disappoint. To make things look seamless, he first demoed the existing top portion and front facade. He then framed out what would be the extension. Doing this prevented us from having to demo the old stairs and everything would be skim coated to look solid. They then filled in the hollow parts with what seemed like all the gravel in the world.

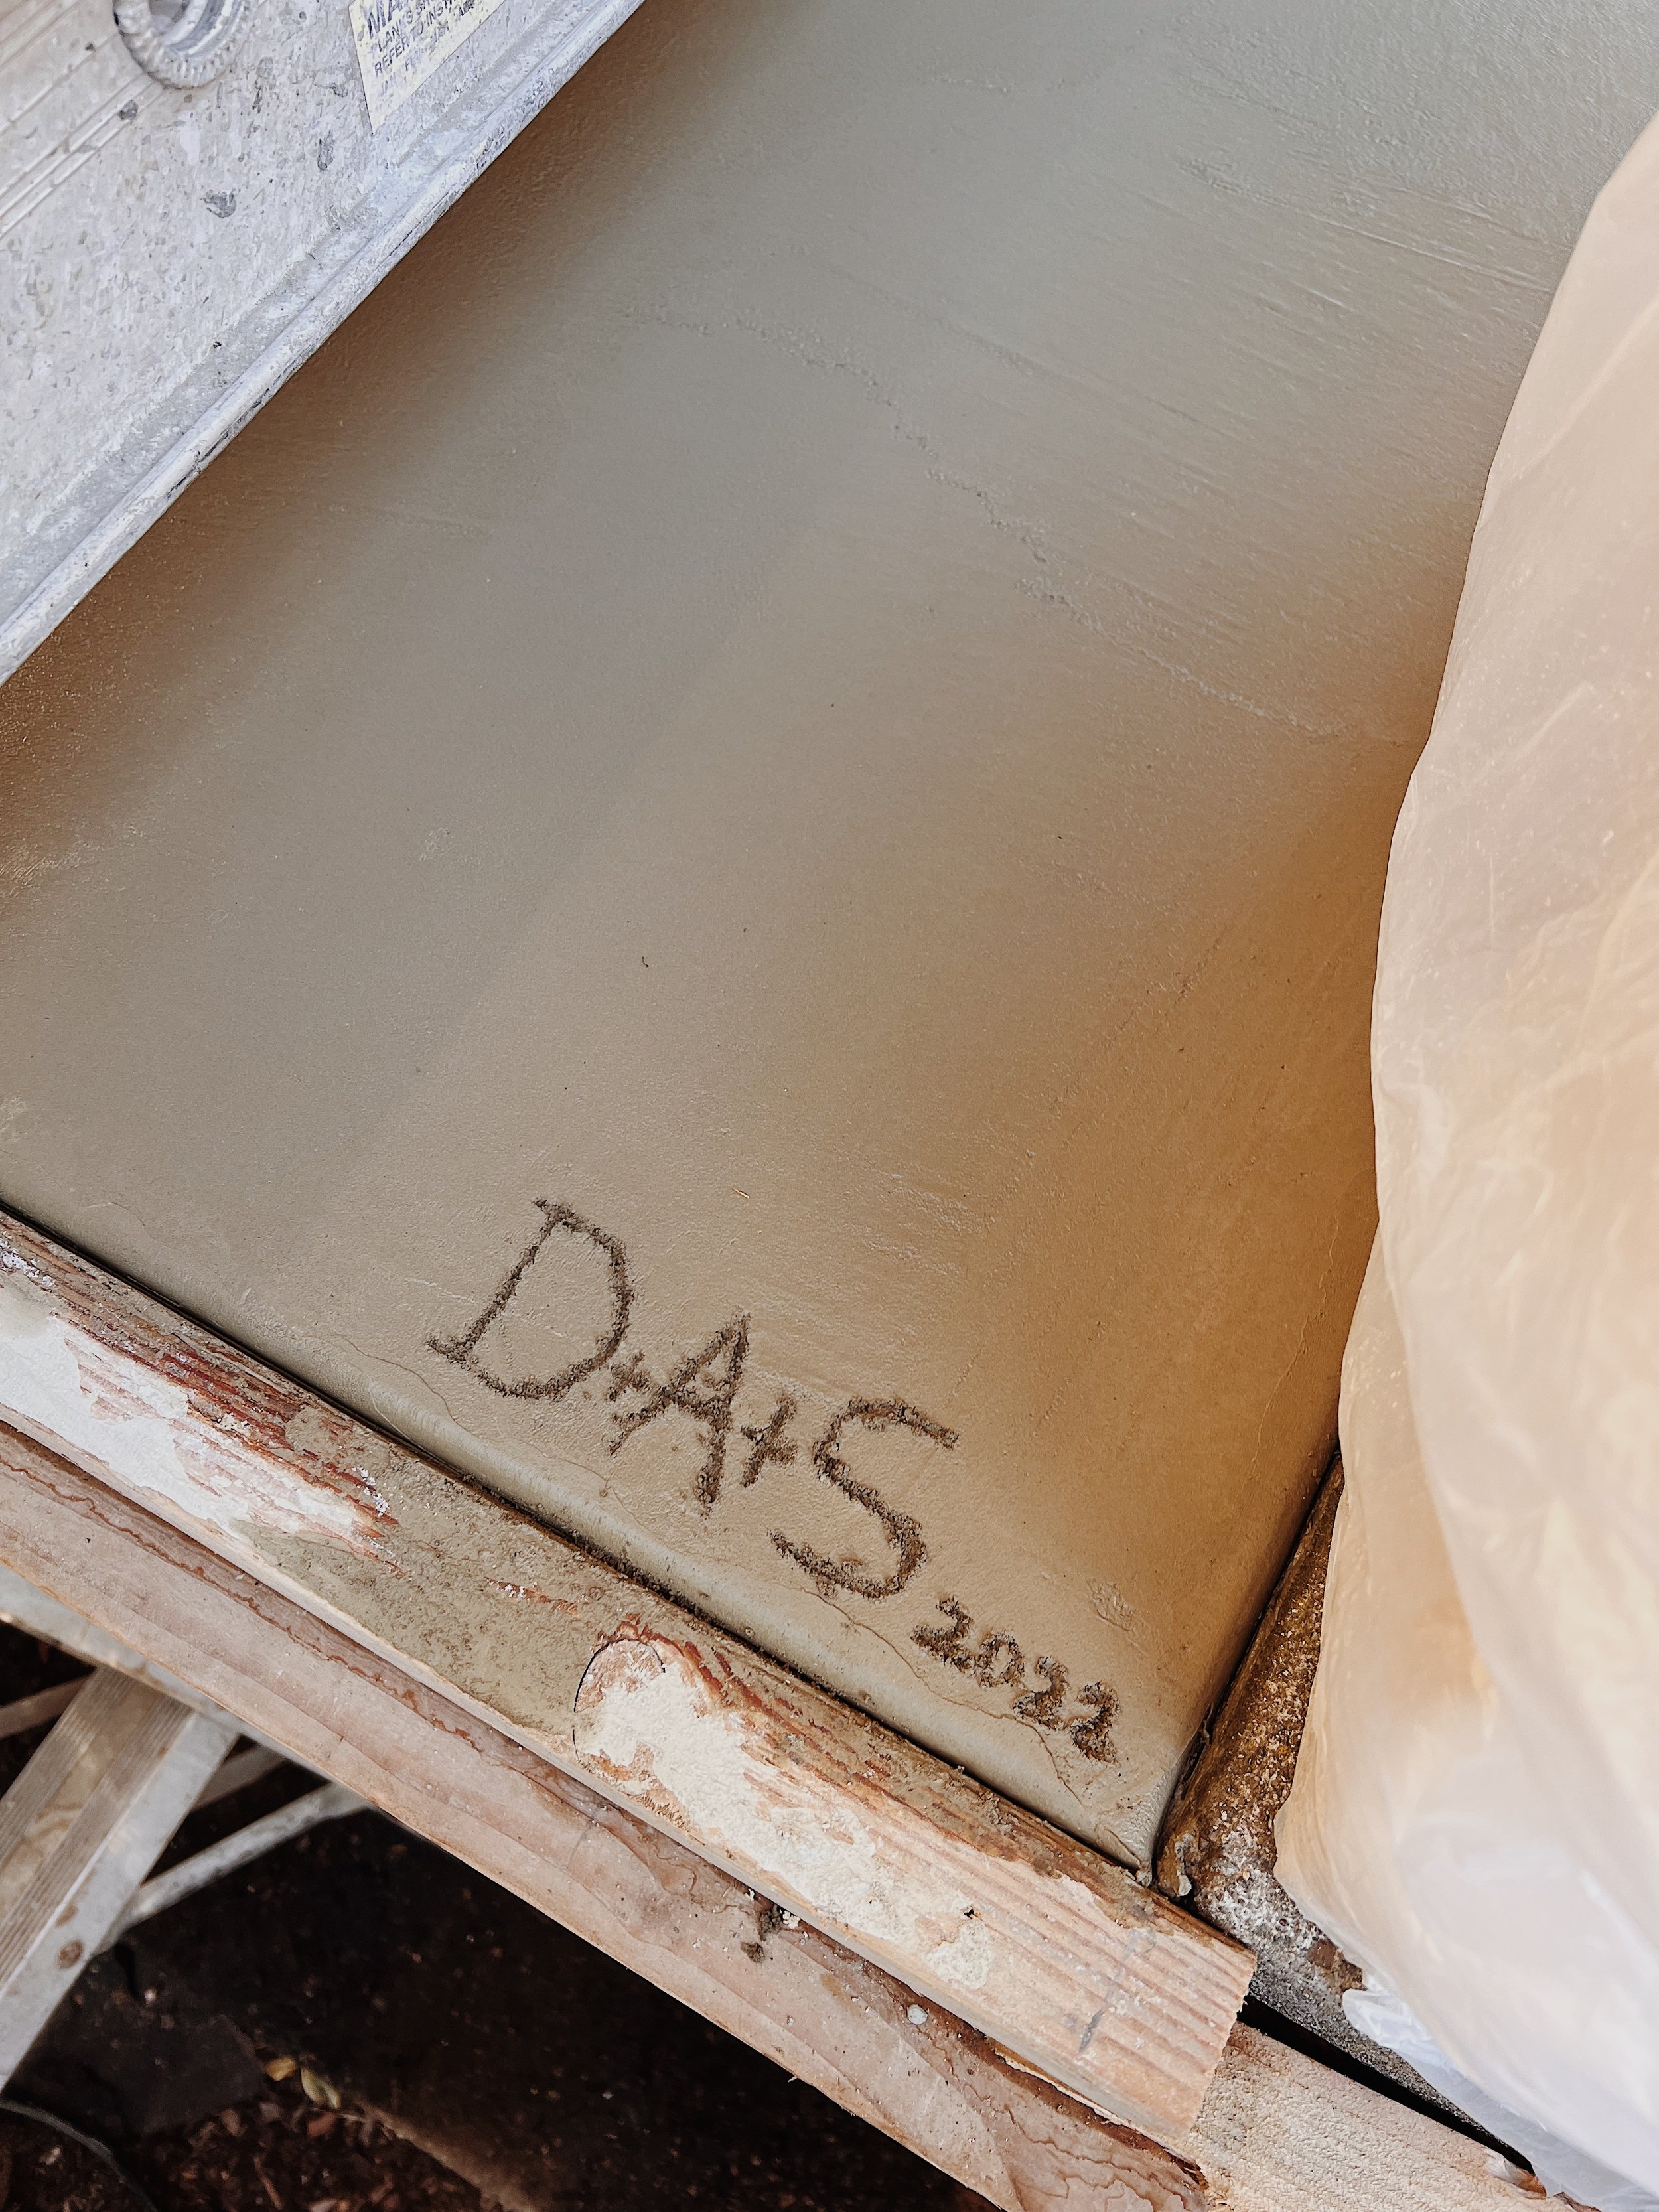
After, he then had “Mini Mix” filled in. The whole process was fascinating and seemed to satisfying. It was so much fun to watch! Also, once the concrete was poured and set enough, we of course etched in “ D-A-S 2022” for “Danny-Andi-Steve”. I couldn’t love it more.

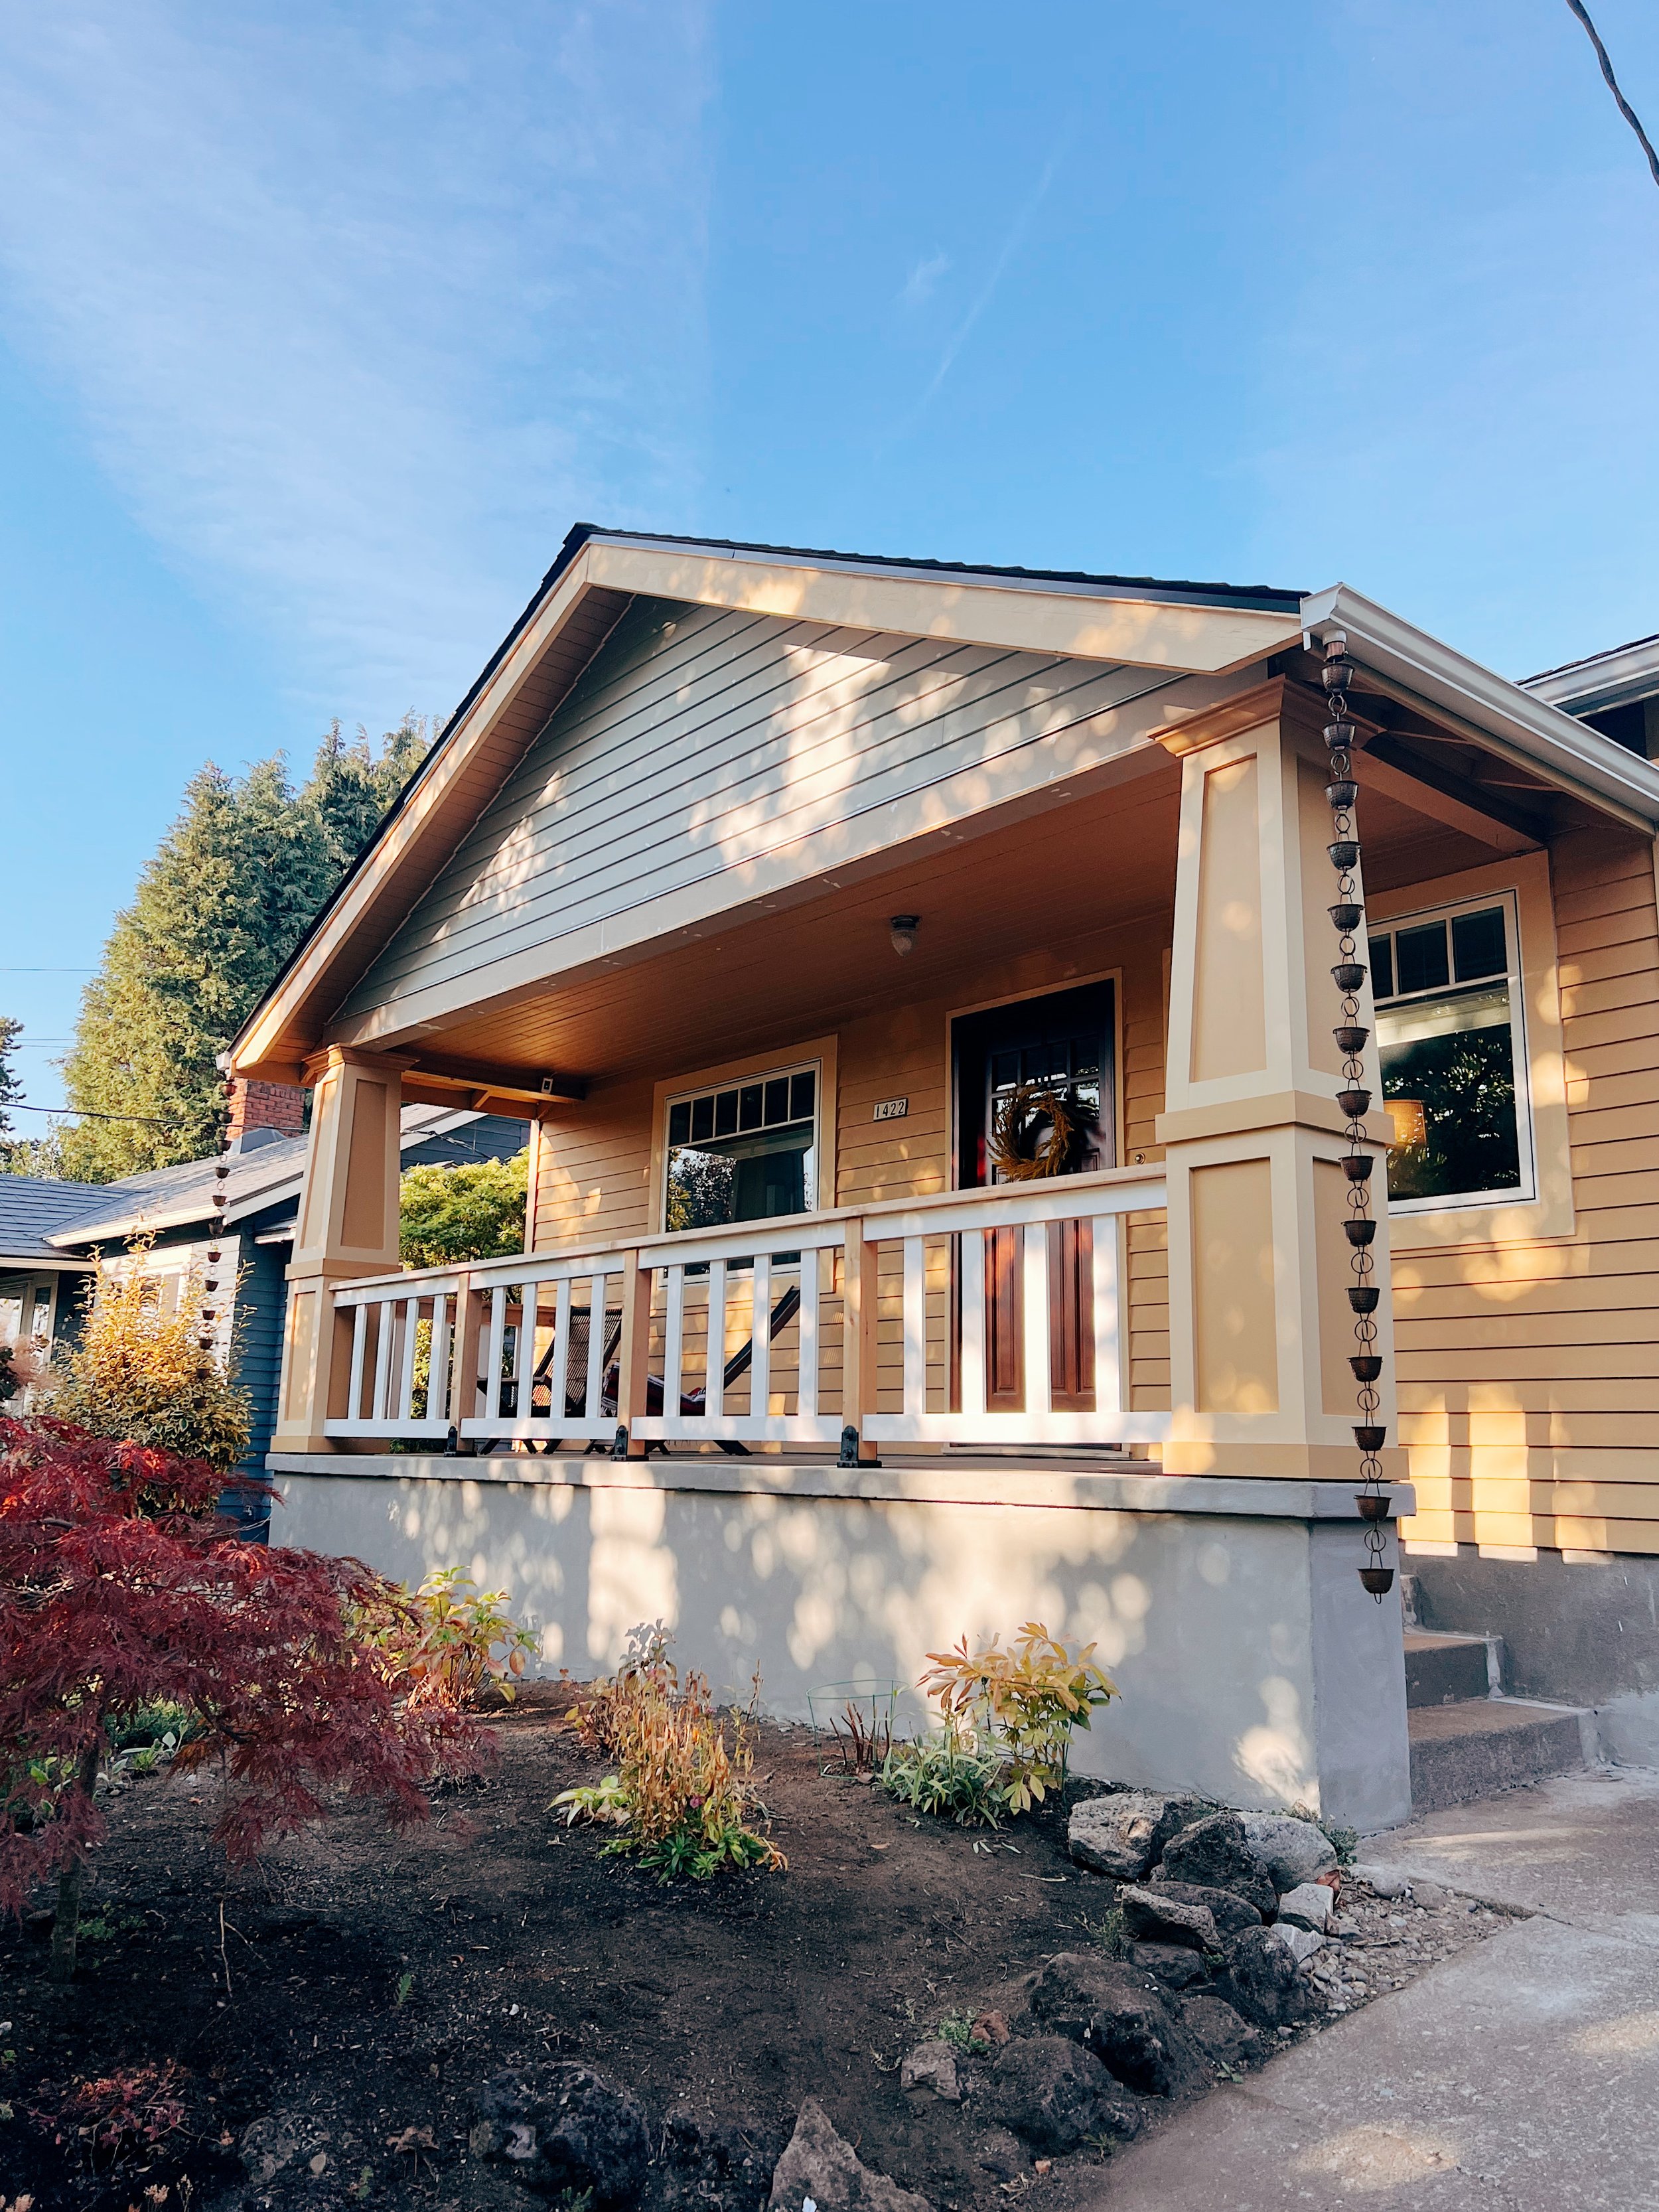
Finally, but not least, we had our new railing installed. Welcome in Contractor #3! Once again, full recommendation from not my colleagues. And prior to us using him, our friends had him build their deck. We were sold. Due to the nature of our the old house and existing factors, the porch was probably the most challenging piece. Silver lining, there’s almost nothing a conversation can’t fix and it turned out perfect. Danny and I picked a picket that match the width of the trim and is also sandwiched between the railing so it looks good on both sides. Just like things with this renovation, it looked like it should’ve been there the entire time.

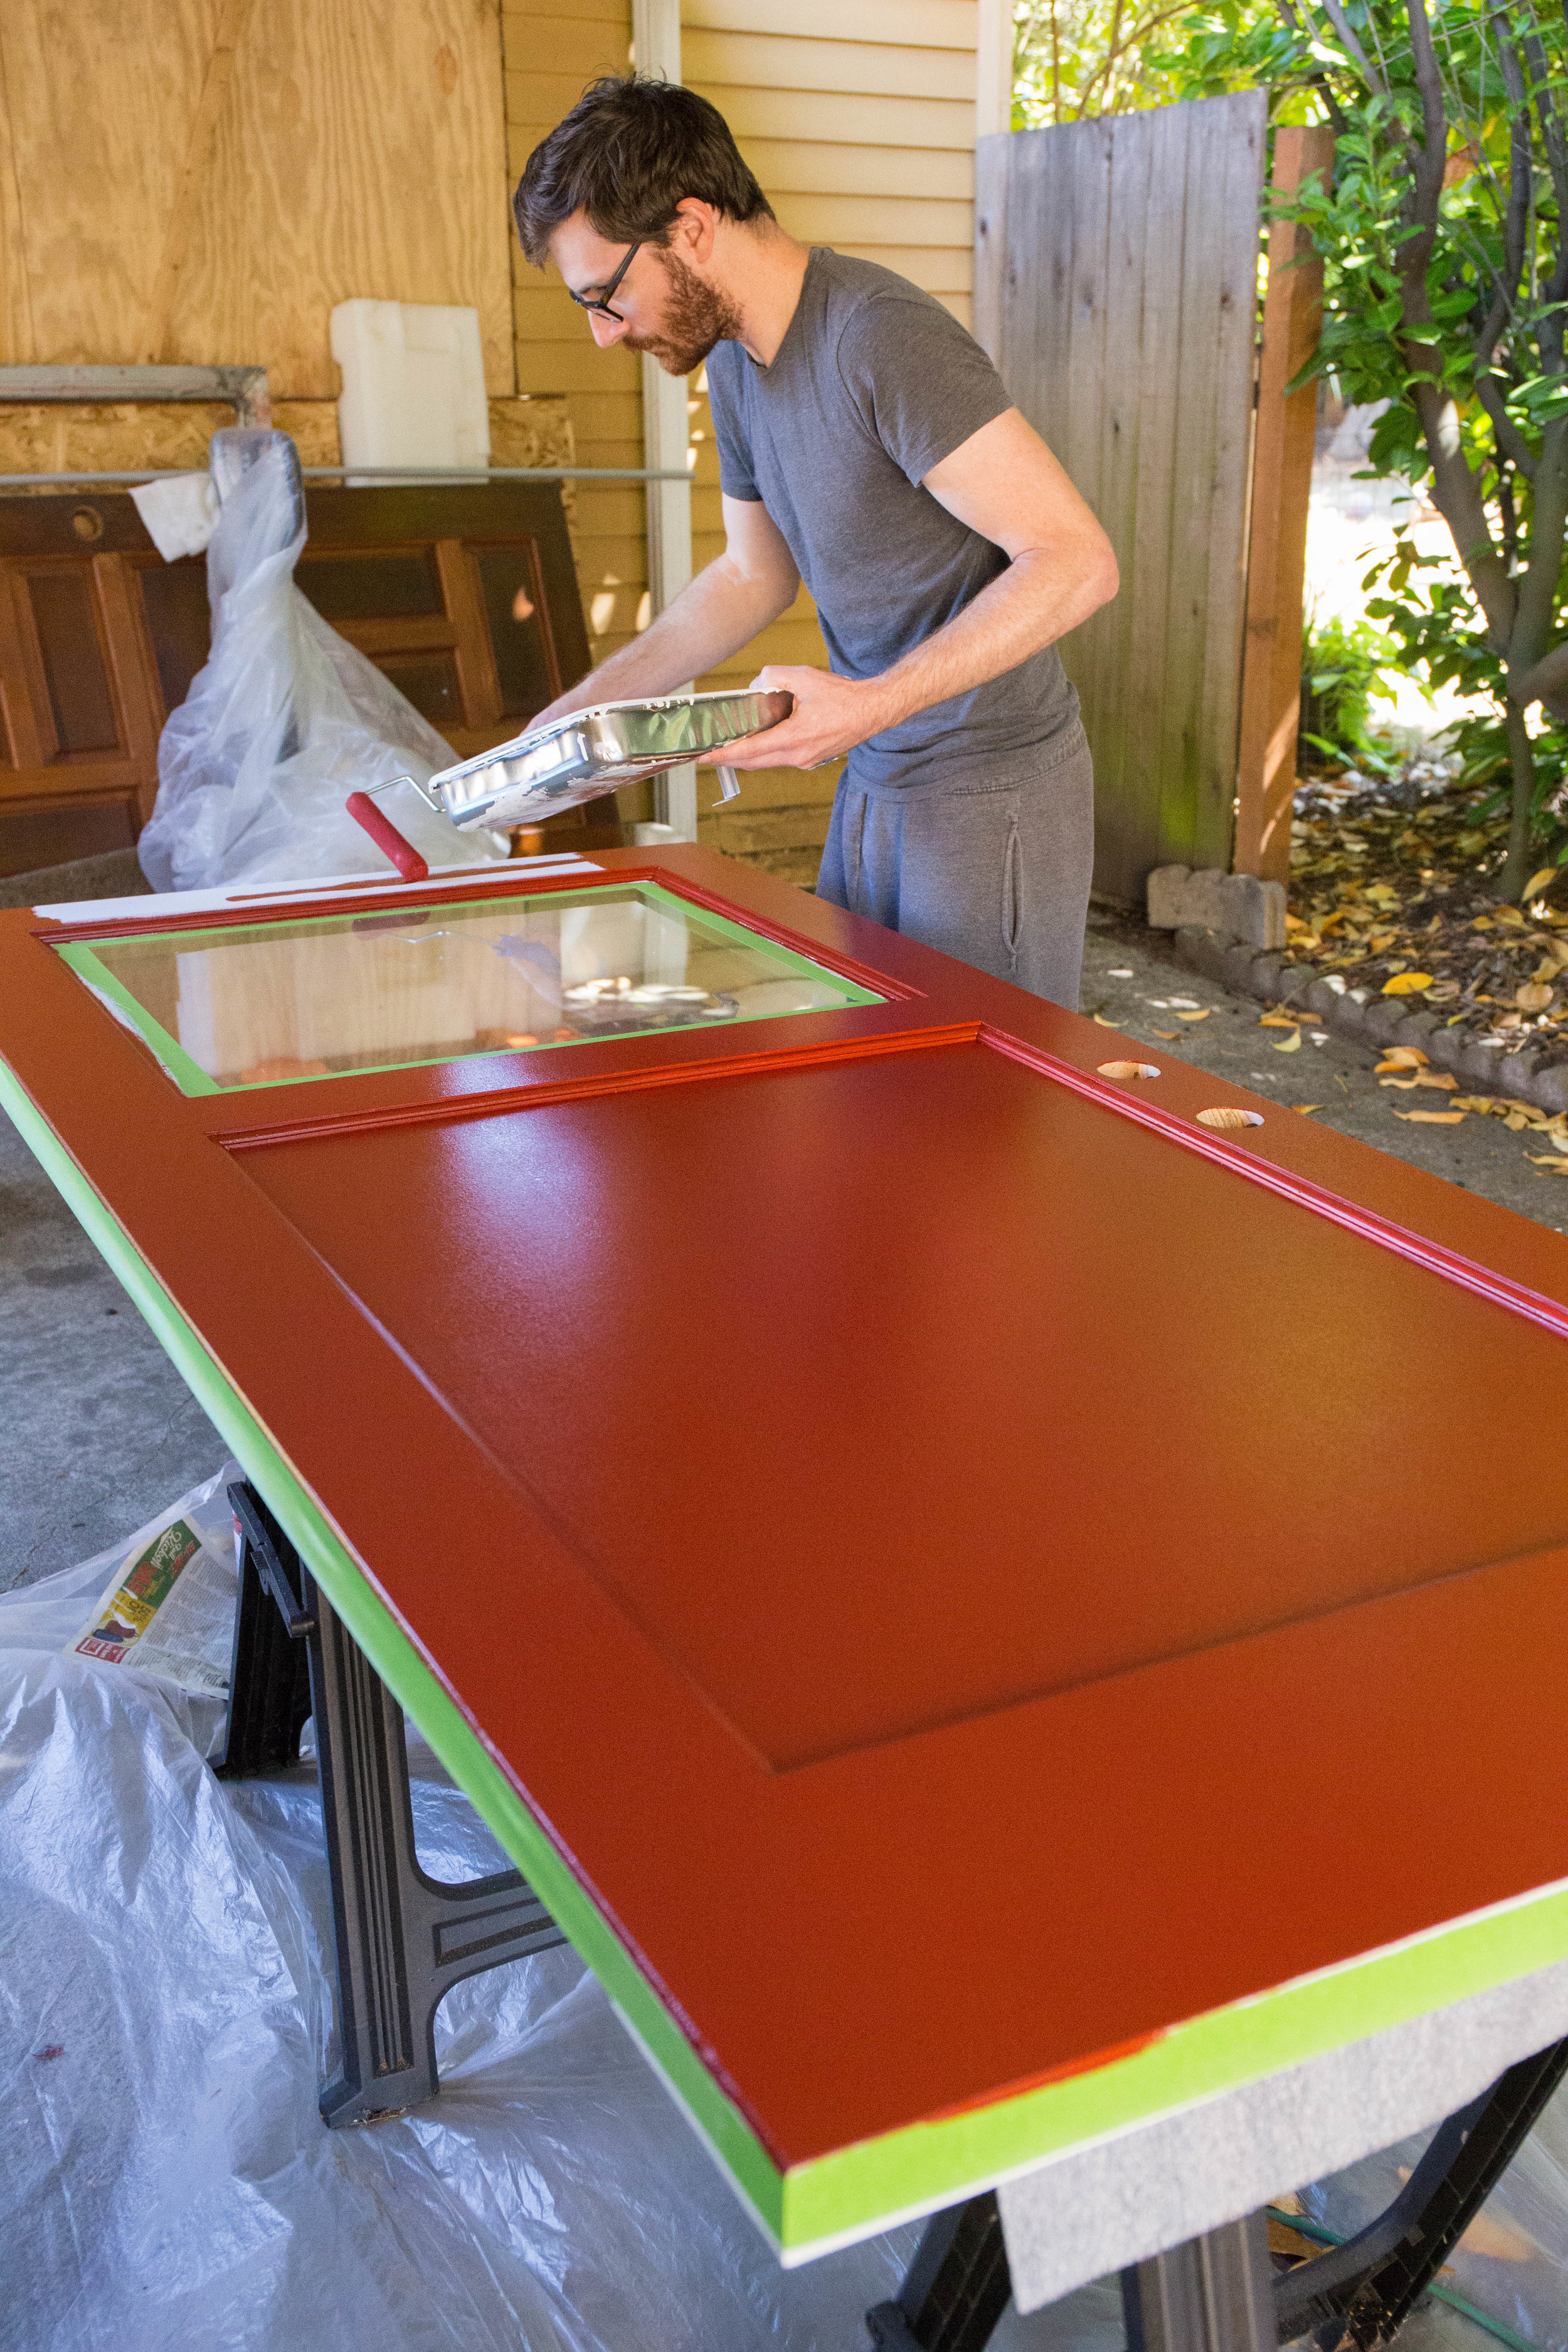
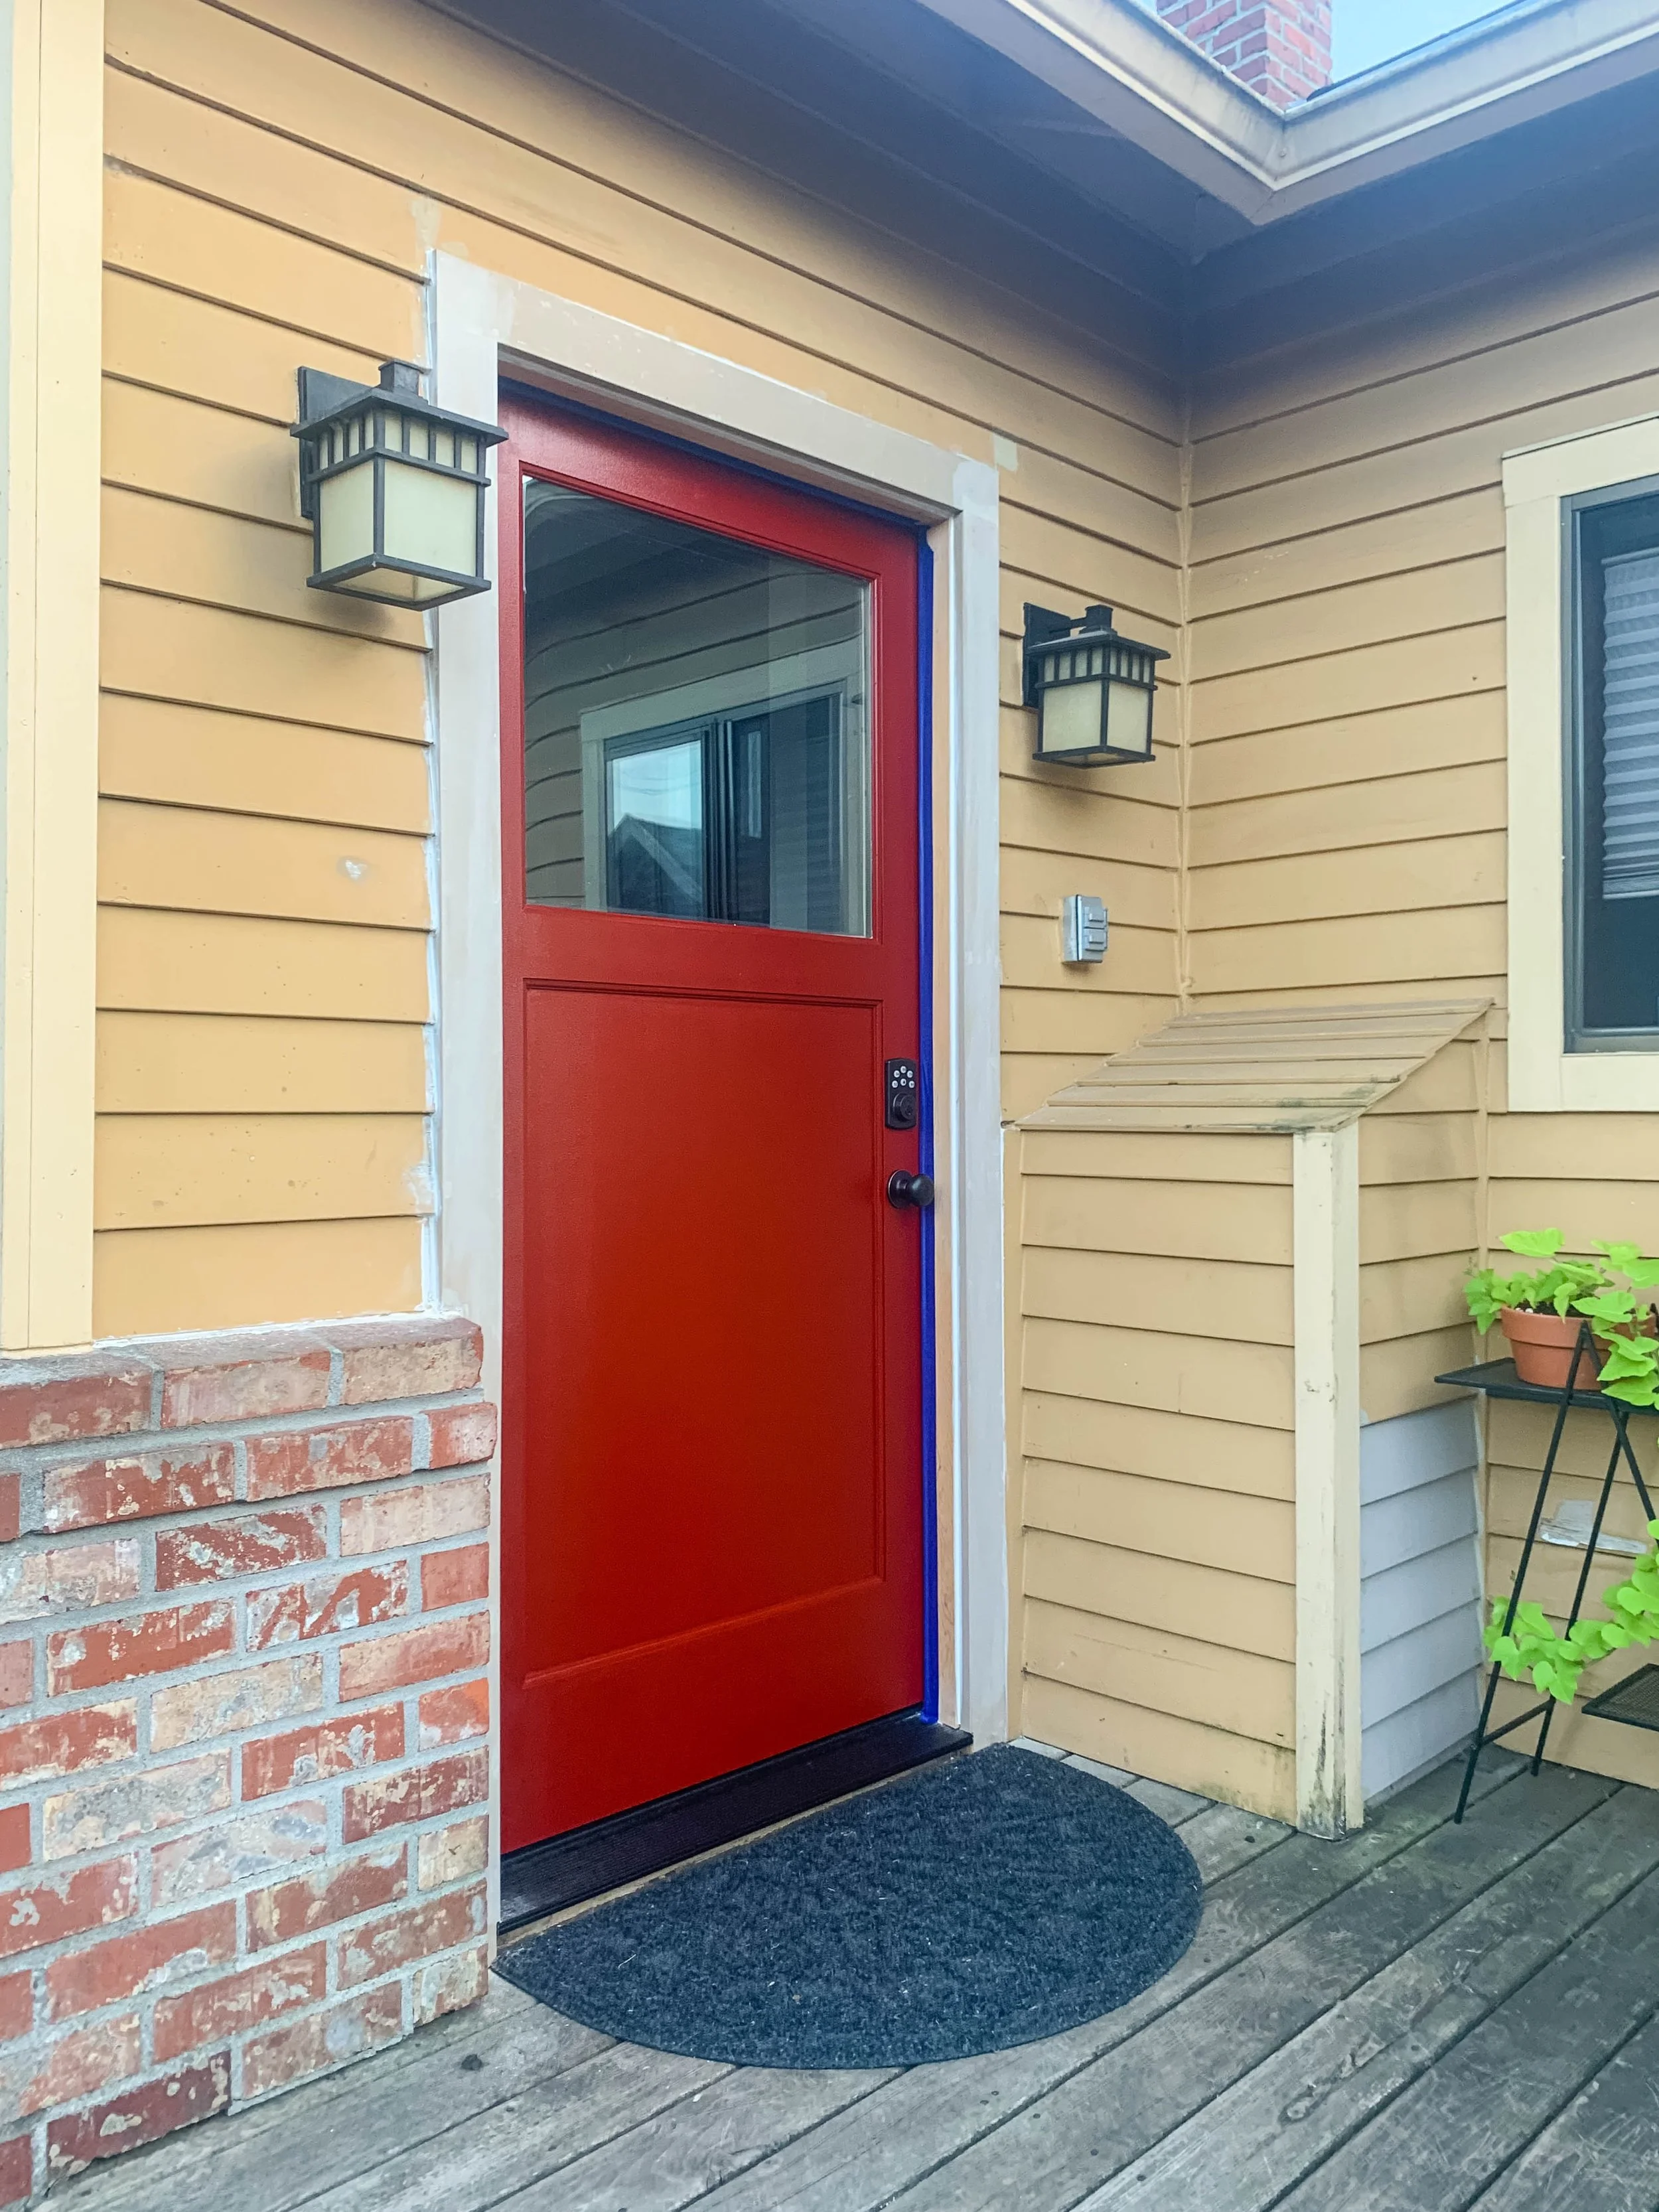
Caulking and painting was by the far the least fun part of this renovation. Though we are hoping to completely change the color of the paint next year (more on that later) we wanted to paint to match because a year is a long time and we also wanted to protect it. But my mentality when it comes to painting: sucks now, will be happy later - pulled me through.

As mentioned, we could not be happier with out it all turn out it. It makes the entire home feel optically bigger and also physically bigger. Literally a dream come true and can’t wait for many more years enjoying this addition.


Follow

OUR HOME : UPDATES

 
7AE10A4F-427F-40AC-95D4-1A9814272D16.jpg

It’s been a while since I posted any updates on our beloved bungalow that we affectionally refer to as Dandihaus. This year has been interesting and filled with smaller DIY projects rather than anything larger scale due to an unfortunate, yet respectful, decision from our go-to contractor. So here’s what we have been working on!


LIVING ROOM UPDATE!
Once the dust settled from the stair renovation and the holiday season we decided to take down the awkward archway that divided main living area and making it flush with the walls and ceiling and closing the original doorway into the hallway to make one seamless wall.
Our living area has always been pretty snug but once the family visited for New Years we realized how constrained we were were by this arch way ifor furniture placement wanted to create a more open space. Luckily, we were able to schedule this project when my father-in-law was still in town so he and my husband got straight to work on demoing. Once complete, it only took our contractor less than two weeks to patch up the walls and ceiling and make new baseboards. Then with a few coats of paint to cover up MORE beige, the living area improved a million times. We were a little worried that closing the old hallway entrance would make it dark and an awkward space in the back but it actually was perfect and created a lot of privacy for the bathroom and guest room.

In the near future we are looking to re-size the one window near the kitchen and replace all windows in this room to match the style of the new one in the staircase, smooth the ceilings, replace the trim, baseboards, and crown moulding. Stay tuned.

8.13-2.jpg
8.13.jpg
8.13-4.jpg
8.13-5.jpg
8.13-10.jpg
8.13-9.jpg

KITCHEN UPDATE!
The kitchen has been such a debate. The original plan was to give it a refresh to hold us over until we could gut and remodel. We started by painting the walls because I just couldn’t take the beige paint anymore. I admit, I did this in kind of a rush without really thinking or wanting to put too much thought in it and just ended up painting it white. Like really white. Like the white in the can sans any pigment. For some reason, I just didn’t think of it until I was half way through and I was already using a paint-and-primer in one and was not about to do it again.
Good news is: WOW did it make an improvement in light. This kitchen actually feels alive now.
Bad news: it is REALLY white.

268E6B61-429F-487F-8ACA-D70D72CE3C55.jpg
99A55E83-40F3-4FC1-ADBA-08CF67CB55FD.jpg
A2BFF2EB-BFD3-4C7B-AA4F-FD941EA11602.jpg
IMG_1536.jpg
IMG_1525.jpg
E0DCA527-A8C6-45BA-8834-BF367D2C86FB.jpg
C0032B8F-77FB-4C53-B69E-E1068A49DDC2.jpg
50C6196B-F2B0-4E09-A0C9-50DD4A00F980.jpg

Next, we were going strip and paint the cabinets which my husband was really against. It was going to be a lot of work and I wasn’t sure how it would turn out. The white walls were great but it did make the ugly ass counter tops and crappy floors more noticeable. Where do you even go from here? We didn’t want to paint the cabinets white now too and we could not find a color that would compliment anything in this kitchen. Not even black would do. And you know what, we kind of didn’t hate the contrast of the wood against the white walls. But man, were they beat up. My dad was getting ready to come out to visit to help us with the kitchen and anything else so, thankfully he came up with a simple and easy solution: Old English. That shit really brought out the warm wood color and hid almost all the wear and tear from decades of abuse.
And then to add insult to injury: these cabinets seemed to have never had any hardware! I didn’t want to go out of my way and spend agonizing hours sifting through the billions of hardware options so I found some decent knobs and pulls on Amazon that I would not feel terrible about getting rid of in a few years with the remodel. We needed a total of about 30ish pieces and couldn’t believe I found these for a grand total of about $50! I think they are great for what they are.

_MG_9317.jpg

We also finally changed out the terrible lighting! My husband switched out all of the crappy bulbs in the canned lights with new LEDs which are awesome. And we finally took down those two awful light fixtures (can you believe I couldn’t sell these babies?)! I ended up moving the pendent light from the guest room and we hung it above the stove and then added an awesome chandelier in the bay window / one day breakfast nook from Schoolhouse Electric.

B4E2B700-2C23-4F52-9E1E-555729DBA1E9.jpg

Lastly and probably the best: WE INSTALLED A NEW BACK DOOR! I couldn’t stand the door that came with the house! It was warped, weathered, didn’t seal completely and was dizzying. Now, this was something that would be a permanent fix so we took this decision more seriously. Thanks to some light internet searching I was able to locate a place called Building Material Resource that sells high end doors that have the slightest manufacturing defects so the doors are literally half the full retail price. And I found exactly what we were looking for!
We picked out a 1/4 lite with a single panel solid fir door by Simpson Door Company. This door was everything that I wanted, it met our budget, and it went perfect for the vision of our future kitchen. It is literally my dream door. Who knew a door could bring me this much happiness?
To save on installation cost, we flew my father-in-law out to help us with putting it in. And it was definitely worth the wait. The door is so beautiful and it lets even more light in! We also went with a keypad lock for it and it has been a great decision.
I totally recommend buying one if you are considering it.

47F47E83-DB1D-4F54-98D3-D5D74D646A90.jpg
IMG_7812.jpg

When it came time to finish it we debated to either paint or stain it. We originally went with stain. But to make a long story short - it didn’t work out. So we stripped it and painted it. We went with Behr’s Ultra Pure White on the inside and Marquee Red Pepper on the exterior (to go with our future exterior color scheme) in semi-gloss. I never thought I wold have a red door but here we are!

IMG_0353.jpg
IMG_0357.jpg
_MG_9287.jpg
_MG_9330.jpg
IMG_0528.jpg
_MG_9337.jpg

BATHROOM UPDATE!
Another hot topic has been the bathroom. What to do with the this bathroom? Almost two years later and all we had done is put in a new toilet (which was huge). I couldn’t deal with the darkness from the turquoise any longer and had to get in there and paint it. I didn’t go for any specific color other than just white for now - I could change later. After what felt like a ton of work - once again the room was instantly transformed. It felt so much more like a clean and bright bathroom now rather than some dated room. I didn’t do the ceilings tho because I hadn’t picked out new lights and honestly the entire ceiling needs to be re-mudded and I didn’t want to deal with it at the time.

CD84C107-10D0-4EC8-8354-C7E0B1046B94.jpg
IMG_7305.jpg
_MG_9325.jpg
A8AE6618-4B6E-4C6A-9F49-A9B52FCB6F73.jpg

Since this was more of a refresh rather than remodel, I wanted to spruce up the vanity, too since ripping it out would’ve created a domino effect. I did some research and bought Rust-o-leum’s countertop paint. This stuff is cool but know what you are getting yourself into. Not only can you “not really” choose your own color, this shit is toxic and takes foorrrrevvvver to dry. But it did make the counters look better. From here I was going to paint the body of the vanity and put in peel-n-stick floor tiles (I found super cute ones from FloorPop!) over the existing linoleum but then once again, changed my mind due to to seeing how much work it was going to be and maybe if I leave it as is it will push me to do the full remodel sooner. But at least we have white walls now right?
I am still in the process of picking out a new mirror and hardware for the towels and such but I did find this awesome lion head ring from my friends at Hippo Hardware in Portland. This will do for now.

38DDB809-D86D-4305-8EA0-198E3A93E5E1.jpg

WE GREW OUR OWN VEGETABLES! AND ATE THEM!
The garden! I have been loving it though I don’t really know what I am doing. Back in the early Spring my husband built me this awesome raised bed out of left over wood we had. I love it. I began starting seeds inside in the winter for this which included super sweet 100 tomatoes, spaghetti squash (I used seeds from a squash we bought and ate from TJ’s), lemon cucumbers, celery, & jalapenos and bought starters for strawberries, spinach, beets, and broccoli. Not everything turned out so good but I definitely learned what to not try to grow again and what not to plant next to each other. It has been super rewarding to grow your own edible food tho. Can’t wait to try new plants next year!

48AAEFA7-F509-4390-96AF-3171B20B24DD.JPG
5CEC0784-8923-41BB-BA0E-6DCEEB41C313.JPG
IMG_5471.JPEG
D4EFF3D5-BAC1-46BF-9EB4-BB06C97C8149.JPG
B16D5B31-047A-4C18-88D1-B879420076F6.JPG

OH. AND THE GRASS DIED… AGAIN.

IMG_9946.JPEG

What a surprise. We don’t know how to care for grass. It’s worse than last year.
Come this fall we are planning on trying to re-seed this barren yard. Also, stay tuned.

Thanks for reading this far! Owning this home and working on it slowly has been such a ride.
More updates to come soon (I hope).
Love ya!

Follow